Friday, February 25, 2011

Lemon Curd

In the continuing what can I do with all these lemons saga, I decided to try my hand at some lemon curd. I had read a blog a while back about making curds and had filed it away under the someday category of my brain but I had honestly forgotten about it as I stared at my pile of lemons over the last couple of weeks. I had been waiting for them to speak to me, like a sculptor staring at a blank rock waiting for it to tell him what it's meant to be. Then, a week ago I had a baking day with some friends, one of whom brought a jar of lemon curd her mother had made. Suddenly that filed away blog post came running back into my mind and I felt silly for not having remembered it earlier. A brief Internet search later I marched into my kitchen with a recipe in one hand and a basket of lemons in the other, ready to create that beautiful mixture of sunshine and happiness that is lemon curd.

Before I launch into the recipe, I know some of you may still be stuck thinking, lemon what? Lemon curd, which is sometimes also referred to as lemon cheese, became popular in England and America in the 1800s as an accompaniment to toast, scones, muffins, etc. during afternoon tea. It can also be used as a filling for cakes and tarts. The most popular form in which you are most likely to have encountered it is in lemon meringue pie, the bottom half of which is lemon curd. Lemon curd is similar to lemon custard, but curds contain more juice and zest than custards, which makes their flavor more intense. Oh and just in case you aren't particularly fond of lemon, curds can be made with any citrus and even other fruits such as blueberries and raspberries!

Lemon Curd aka Sunshine on a Spoon
recipe from Fine Cooking

Ingredients

6 Tbsp. soft unsalted butter
1 cup of sugar
2 whole eggs
2 egg yolks
2/3 cup of lemon juice
1 tsp. lemon zest

Directions

1) In a large bowl beat the sugar and butter together with an electric mixer for about 2 minutes.

2) Slowly add the eggs and yolks. Fully incorporate each egg/yolk before adding the next one.


3) Beat mixture for 1 minute then add the lemon juice. Be sure to strain the lemon juice  to get all the bits of  pulp out so your curd comes out smooth. Cheese cloth works great for that.


4) Heat the mixture in a non-reactive pan over medium heat for about 15 minutes stirring gently but constantly. Do not let the mixture boil. The curd is done when it reaches 170 degrees or when it has thickened significantly and your finger leaves a path through it on the back of a spoon.


5) Remove curd from heat and add zest. Allow to cool slightly then transfer to a bowl and cover with plastic wrap so that the wrap is touching the curd. This will prevent a skin from forming on top of the curd as it cools. Refrigerate overnight and then transfer to permanent lidded containers such as canning jars.

*Notes
-When you first add the lemon juice the mixture may curdle a bit, don't worry, it'll all melt together.

-The curd is very hot at 170 degrees. Be prepared for it to hurt your finger if you use the spoon test.
-This batch should make roughly two cups of curd (total estimate, I didn't measure).
- Curd will keep in the fridge for a couple weeks, or you can freeze it and use it over the next six months or so.
-Be careful when heating your curd that you don't overcook it. It quickly goes from being about 150 to being 170. I got surprised by that and ended up cooking mine up to about 180. It tastes fine, just not quite as awesome as it would have.


Thursday, February 24, 2011

Lemon Pickles

There is a blog I very much enjoy reading called Tigress in a Pickle. While I rarely get to pickle things because I live with a pickled food hater (and pickling for one seems like a lot of work), I still enjoy reading her always interesting recipes and partaking of her brief but witty posts. She does a lot with Indian flavors which I find rather interesting, and when she posted about Indian sun pickles I just had to give them a try.

You see, I have a plethora of lemons from my lemon tree/bush right now and have been at a loss for what to do with them. One can only drink so much lemon aide and I already have a batch of limoncello steeping! If you do not find yourself in my position, I'm pretty sure you probably have a neighbor who is and would love to unload some produce on you. If, however, you're neighbor is a stingy mean old man who would rather see his lemons rot on the ground than give a few to you, just remember, the cover of darkness is your friend.

These sun pickles also don't really resemble what westerners would consider to be a pickle, so I think Jeffry will find them tasty. Sun pickles are like preserved lemons, but with more interesting flavors than salt and cinnamon. The lemon juice and good old fashion sunshine are what pickles the lemons, so no vinegar taste here. I'm not entirely sure what I will do with these once they are done, but the Tigress recommends chopping them up and mixing them with some basmanti rice and a dollop of yogurt on the side. I figure I'll start there and then begin experimenting. Perhaps some mixed in with fresh steamed cauliflower? I halved her original recipe to be more realistic with my uses. Whether one is canning, gardening or crafting it's always important to keep your production in line with reasonable use (are you really going to use 30 handmade doilies?). No point in storing two liters of pickled lemons in your fridge if you're not sure you're even going to like them. If you do end up loving them, you can always make more!

Sweet n' Spicy Lemon Pickle
from tigress in a pickle

Ingredients

8 small very fresh lemons, no blemishes

2 small lemons, juiced
1 Tbsp. cayenne powder
1 cup lightly packed brown sugar
1.5 Tbsp. sea salt
.75  Tbsp. whole fennel seeds
.75  Tbsp. whole cumin seeds
.5 Tsp. whole fenugreek seeds
.75  Tbsp. whole peppercorns
1 liter jar with a tight fitting non-reactive (no metal) lid
(I got my jar at cost plus, but I imagine ikea carries some good options too)

Directions

1) Wash your lemons and scrub any dirt off them. Make sure they are completely dry before moving to step two. Any water or yuck on your lemons could add to the risk of the batch going bad as it pickles.

2) Roast the fennel, cumin and fenugreek seeds in a dry pan over medium heat for a few minutes until they turn a shade darker and start to give off a toasty aromatic smell. Careful not to burn them. Once toasted, remove from the pan and grind the toasted seeds along with the salt and peppercorns. You can do this with a spice grinder or a mortar and pestle. This is a good task for your spouse/helpful friend while you do work on #3.


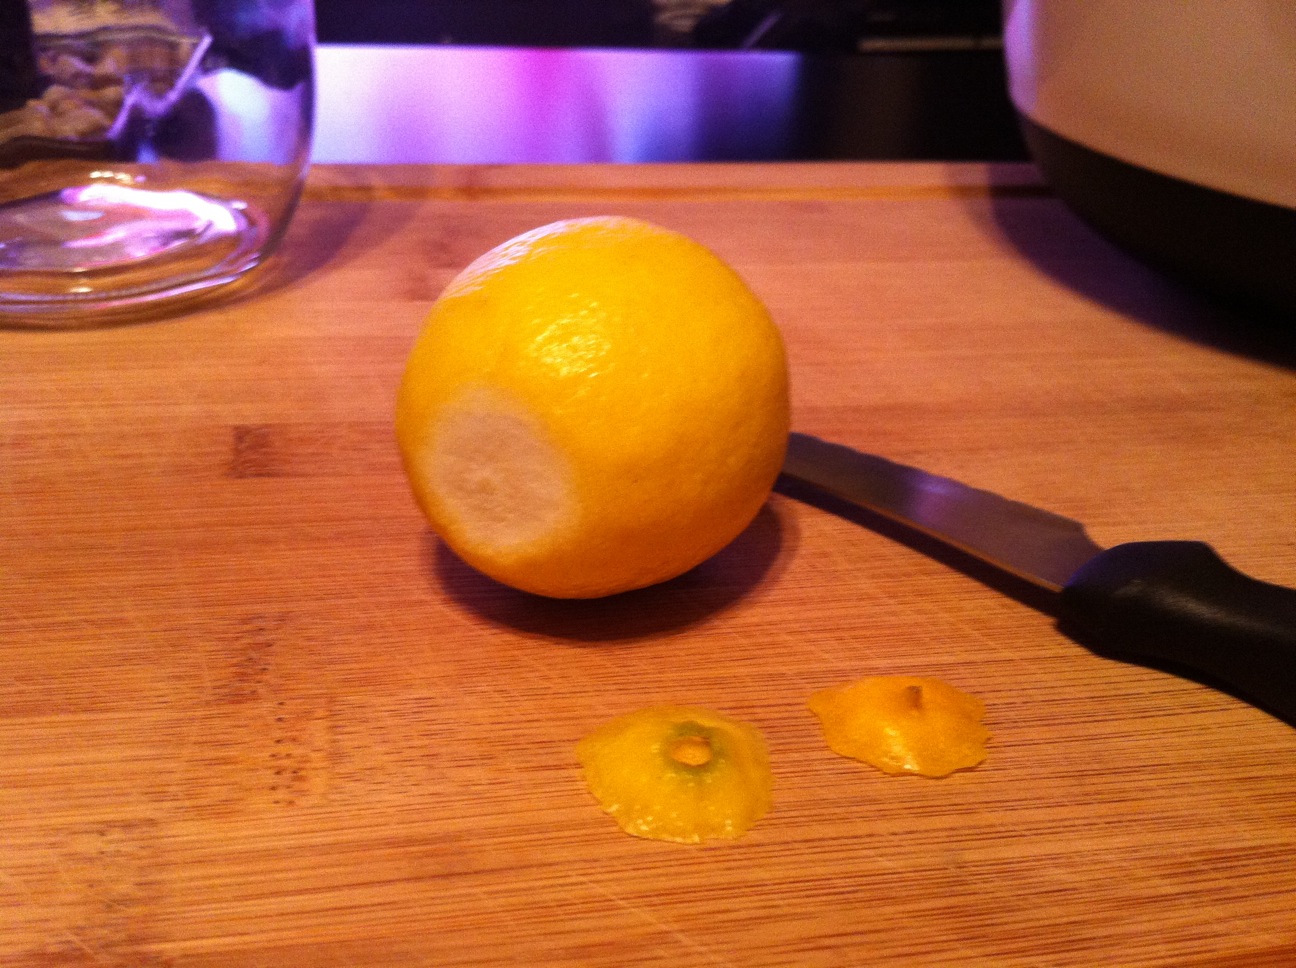
3) Cut off the two bump or scar ends on the lemons. Then cut them into medium sized chunks. I quartered mine, then sliced each quarter into two or three pieces. Remove any big seeds you find.

4) Mix your ground spices with the brown sugar and cayenne pepper.


5) Fill your very clean, very dry jar half way with lemons. These will shrink a lot over the next few days so don't be afraid to really pack them in there. Pour half the spice mixture over them and fill the jar the rest of the way with lemons. If your jar isn't full, you can always add more lemons than the recipe calls for. Top with the remaining spice mixture and the juice from two lemons.

6) Close the lid and shake vigorously!

7) Place jar in a sunny window for 8 weeks and shake once a day to distribute the spices. After the 8 weeks you can place the jar in the fridge where it should keep for a year.


*Notes
-Fenugreek is an indian spice and I highly recommend buying from a food co op. A whole jar of spices from the bulk bin at a co op costs about 50 cents. Refilling your spice jars from the bulk bins will save you a TON of monies.

-You can check the mixture at 7 weeks to check for doneness. If the liquid has thickened and the skins are soft they are done and can be put in the fridge.


Wednesday, February 16, 2011

Doodles by Andre Jordan

While I plan to post a delicious little recipe for some hobbit sized treats later this week, I thought I should give you all a little something to tide you over until then. Really though, I was just looking for an excuse to introduce more people to the wonderful twisted honest and sometimes dark humor of Andre Jordan.

Andre Jordan is a British cartoonist that now lives somewhere in the middle section of America with his wife and blind pit bull named Little Man. He started doodling in 2005 (before the wife, the dog and the house) as part of therapy to deal with his depression. Eventually these dark and tragic doodles led to a book called If Your Happy and You Know It which was later followed by another doodle book, a memoir, titled Heaven Knows I'm Miserable Now. In addition to books, he also has a doodle series that he does for the BBC on the topic of mental health.

So you're probably thinking to yourself, jeeze this is all a bit heavy and what does it have to do with gardening or homemaking? Well, in addition to his other projects, Andre Jordan also does a weekly doodle for the gardening blog A Way To Garden. In it he shares the joys, frustrations and the inherent comedy of life in the suburbs.  His doodles cover the spectrum of life's events from the constant back and forth of keeping up with the Joneses, planning sweet revenge against your neighbor who mows his lawn at 6 am on a weekend, the battle of wills between a husband and wife who both garden or the pitfalls of desperately trying to grow things outside your climate zone. Since I didn't ask for permission to post them here, you can follow  a link to his doodles here and below I have linked to a few of my personal favorites. He's done a lot so I promise these can keep you occupied for quite some time.

We've all been here.

                                 Compromise in the garden.

                                 My all time favorite as I've lived through it.

                                 Dead Heading.

                                Enjoy!

Monday, February 14, 2011

Using Your Pack Rat Horde

So, I don't throw things away. Well, let me modify that, I don't throw away anything that could possibly have even the slightest bit of meaning to me. This means that every movie stub, unremarkable pebble, etc. that I can attach to some greater meaning or memory I keep. I still have notes I passed in elementary school and if you've ever given me a card, I probably still have it stashed away in a box somewhere.

You might think this is a crazy thing to do, but I have learned to harvest such things for crafty purposes. For example, say you have a box of random bits and bobs from a vacation you took that was particularly memorable for you. Take said bits and bobs (as long as they are flatish) and get yourself a collage style frame from Michael's. Then scatter said bits and bobs throughout the frame. If things are too small to fill a specific picture spot, you can attach them to a coordinating piece of paper that is big enough to fill the space. You could even step it up a notch and pick a theme or color to tie everything together. For example, if you did a trip around Europe you could fill a frame full of money from the different countries you visited, or if you're a big sports fan perhaps some old ticket stubs, button or stickers and some pictures of you at the game would be most appropriate. Even things that don't seem that exciting can work great for this. I have one from my London trip that has everything from a half filled coffee punch card to torn movie stubs to my student ID.

So where am I leading you with all of this rambling? Well, since I painted my kitchen a much darker color than I originally anticipated, I decided to put something bright on the walls to spice it up a bit. Originally I was just going to go with some generic happy food pictures from Ikea, but after I found these three slot frames for $10 a piece I knew they would be perfect some some sort of memento collection. After scavenging around the house for a bit I landed on the back drop I had used for photo's at my engagement party. It had lemons on it, which are definitely in the bright and cheery category and it had said "Asbury Farms" across the top. I had found it shoved into a high shelf in my garden shed and figured if I hadn't done anything with it for the last 6 months then I could probably cut it up without fearing that I'd destroyed my memento. Besides, people now can actually see part of it which is one of the big upsides of using such things around your house. So here is how it turned out.


I had a terrible time trying to avoid glare on these, but you can get the idea. The A is from the Asbury and the Fa is from Farms. I would have rather just gotten the F by itself, but the A was nestled too close. While projects like this won't have instant meaning for those who visit my kitchen, they are cute by themselves and give my the opportunity to share the story with those who ask.


Here is my wonderful husband making me a Valentine's Day breakfast in our newly purple kitchen and the two frames on either side of the cabinets.

So to recap, using mementos from life events to decorate you home is great because:

1) Its free

2) It keeps said memories out in the open where you can enjoy them

3) It gives your space an instantly personal non-generic feel

Sunday, February 6, 2011

Is Anyone There?

So I know it's possible that I have lost all of my devoted readers after my 6 month hiatus, but hopefully after I call all five of you later this evening we will once again be up and running as a wonderful blog about my little slice of domestic life. Just in case this blog had some silent followers out there who aren't relatives and therefore have been left in the dark as to where I've been, or you are simply one of my devoted readers who would love to hear a recap of the last six months, here you go.

First, I did this...

I couldn't have asked for a more beautiful ceremony or for better friends to share it with. Everyone who was a part of it either as a member of our family, the wedding party or simply as a witness was a blessing and made the whole day exactly what we had hoped for. Oh and my brother's shirt never officially came off, so I count that as a victory indeed.

After the wedding of course, we did this...


Thanks to my mom we were able to spend a little over a week in Florida at Disney's Vero Beach resort and on the Disney cruise ship. We were both battling colds for much of it, but luckily I married a guy who took care of me even when he felt bad too. Our first day on the boat felt like we were sailing straight into a hurricane, but the final day (when this picture was taken) was so smooth it looked like we were drifting across an ocean of glass.

Since there is no rest for the wicked, we returned just in time to gear up for the wedding of our dear friend Helen (which I unfortunately have no picture of) followed directly by....


With the weddings and honeymoon I must admit we missed Halloween all together. Not a single decoration went out, but we did get to enjoy Thanksgiving and Christmas. I managed to get my Christmas cards out in the first half of the month and attend/host several different Christmas gatherings all filled with the joy of good people and good food. 

Even with the wonderful madness of the holidays, I did find time to try out one new craft....


I've been toying with the idea of an etsy shop again lately and decided to try out some new crafts to see if anything would stick. The above is my effort at glass cutting. It was exciting because it involved fire and explosions. I have since learned a new not so exciting technique involving hot water but its far more efficient so alas, bye bye fire.

So where have I been since Christmas/New Years? Watching television!!! It takes a lot of forethought to get projects going and since I hadn't had time for that sort of planning I found myself in January with nothing in the works. I am gearing back up now though and look forward to the rest of the winter which will be filled with some home improvement projects and spring garden planning! Thanks for coming along for the ride.