The extension rooms have been the epitome of our house (before all the work we've done since moving in). Nothing in them was broken necessarily, but they weren't particularly nice either. The carpet was stained, the walls were covered in poorly installed panelling and none of the trim matched. For all it's faults however, I love those rooms. I love that it has two large windows looking out at our apple trees, a sliding glass door into the back yard, a warm pellet stove to rotisserie yourself in front of on cold winter days, a large amount of space for hosting parties and a slanted roof that makes it feel somehow special and tucked away.
While we were away in Mexico, our house sitter burned a whole in the carpet with a misplaced heat lamp. This finally gave us the push we needed to look into new flooring. We bit the bullet and decided to go with hardwood to match the rest of the house. It costs a pretty penny more than just replacing the carpet, but this is a HIGH traffic area from the backyard and is often the site of family dinners and parties. I could ignore the falling food as long as the carpet was already terrible, but new carpet + food = crazed Robin. Our beautiful hardwood will be installed as soon as we finish....the WALLS!!
If we are going to replace the floors, I thought to myself, why not go all out and just redo the room. I was pleasantly surprised to hear Jeffry say he thought that was a good idea, and I set to work researching how to hang drywall on the Internet. The process is really pretty simple. What isn't so simple, is the fact that nothing in the room is level/straight so our attempts to hang matching seams in the drywall have been, well, a character building exercise. We were lucky in the fact that two of the four walls we have to deal with have drywall hung behind the panelling already so those just need to be taped and mudded. This was a merciful discovery that has greatly reduced the amount of work we have to do.
There were also two windows in the wall that used to belong to the outside of the house that we also had to take care of. A large portion of one of our days was spent figuring out how to remove said windows and then frame them in so we had something to nail the drywall to. Many petitions have been sent up to the saints of mud and texturing to plead with them to cover the sins we've committed while hanging the drywall. At the end of the day I must simply remember that anything is better than what we had, and we have a lot of furniture along the walls in that room anyways!
At this point we are a bit behind where I thought we'd be but not bad. It took us an evening and a day to move all the furniture into the garage and tear out the panelling. The carpet tear out has been a bit more of a pain because the interior walls of the room were build ON TOP OF the carpet. Who does that!? It has meant that tearing out the carpet in a nice clean line along the walls has taken much longer than expected. First we had to cut it as close as we could to the wall and then use pliers to tear out the rest of it. I don't know how anal we have to be about it, but I don't want the flooring guys to show up and charge us saying they had to do some clean up (we got the quote reduced by saying we'd have the room completely ready for them).
So on Sunday my mother came down to help us estimate materials and then brainstorm how to deal with the windows. By the end of the day we were able to start hanging drywall. This process has continued through today thanks to Jeffry and some friends and family members who have come over to help him while I'm at work. By the end of today we will hopefully have all the drywall up and will be ready to start mudding, sanding, mudding, sanding, mudding.....well you get the idea. there are several layers involved. I'll be checking in over the next couple of days with updates/lessons learned as the process progresses!
Wednesday, June 1, 2011
Wednesday, May 25, 2011
I think I can, I think I can...
Although we haven't had an overabundance of hot sunny days so far this year (What's with the rain storm, it's almost June!), we have managed to avoid the late freezes that seemed to plague gardens last year. Not that things are growing with reckless abandon, but they are keeping a slow and steady pace as the days get longer and the sun spends more time out in the open. My squash patch has been soaking up that sunshine and putting it to good use.

The crooknecks have been making the most progress. All of my plants have several female flower setting.
 Not to be left behind, the zucchini plants have just started forming little buds. I remember as summer came to a close last year I thought if I ever saw one again it would be too soon. Now however, I'm craving a large hearty scoop of sauteed zucchini with my dinner!

Well they still have a long way to go, and the butternut hasn't even been planted yet, but I am happy to report a healthy set of squash this year. My heart goes out to the poor victims of the Sacramento hail storm a few weeks ago. I hear many good squash plants perished in those parts as a result. Don't worry, my plants will carry on the good fight.


Well they still have a long way to go, and the butternut hasn't even been planted yet, but I am happy to report a healthy set of squash this year. My heart goes out to the poor victims of the Sacramento hail storm a few weeks ago. I hear many good squash plants perished in those parts as a result. Don't worry, my plants will carry on the good fight.
Thursday, May 19, 2011
Herb Garden Revisited
Back in March I shared with you my new herb garden. All the plants were such small hopeful babies that barely made a blimp in the dirt. In case you forgot, here's a reminder.

Over the past couple of months, these little blips of plants have stretched their legs and filled in the space with great enthusiasm. They have also been joined by a few friends, both intentional and unintentional. I have since planted two dill and two Thia basil plants. Some intruders who snuck in there are chives and tarragon that apparently refused to die when I dug up the original herb garden.
 Its really hard to get a good full picture of the herb garden since the raised beds start right behind where I'm standing to take this picture. Here is another that gives you a better idea of the different colors I was able to get out of plain old herbs.
 The amazing purple flowers are from thyme. I know I need to cut them but they are just so pretty. I bet they would make a great salad garnish. Behind that are two different kinds of sage with drastically different leaf colors, and behind those are bright green parsley. Love it. Love it. Love it.
OK, I might be basking in this a bit at this point, but a lot of times my big plans don't come together as well as I would like, and this one is just like I pictured it in my head. I have an herb garden that is beautiful to look at and provides me with a ton of herbs. I know have fresh rosemary, genovese basil, Thai basil, tarragon, thyme, marjoram, chives, dill and parsley growing right outside my door. I even have room for a few more varieties!!!

Over the past couple of months, these little blips of plants have stretched their legs and filled in the space with great enthusiasm. They have also been joined by a few friends, both intentional and unintentional. I have since planted two dill and two Thia basil plants. Some intruders who snuck in there are chives and tarragon that apparently refused to die when I dug up the original herb garden.


OK, I might be basking in this a bit at this point, but a lot of times my big plans don't come together as well as I would like, and this one is just like I pictured it in my head. I have an herb garden that is beautiful to look at and provides me with a ton of herbs. I know have fresh rosemary, genovese basil, Thai basil, tarragon, thyme, marjoram, chives, dill and parsley growing right outside my door. I even have room for a few more varieties!!!
Wednesday, May 18, 2011
What a Difference a Week Makes
Well friends I am now back from my cruise and got a chance to briefly toodle around my yard this morning, and what I found surprised me a bit. Everything has exploded! I was concerned with the crazy storms our area had while I was gone that I would be coming home to stunted and possibly destroyed plants, but the opposite has occurred. Take a look at this giant handful of strawberries I picked this morning.

Now, strawberries don't often make it from the bed all the way into the house because they generally get eaten right off the vine. This morning however, they made a beautiful addition to my bowl of cereal. I'm not generally a big cereal eater, but with these added to the bowl it made a nice light breakfast after the past week of gluttony.
Something else that has done quite nicely are my tomato seedlings. They spent the whole week outside and seemed to handle it just fine. My Amish Paste tomatoes seem to have done particularly well.

If your tomatoes didn't fare so well in the past week of inclement weather, feel free to take a few of these off my hands. I'm happy to share. I think I'm going to give these guys one more week in the red cups and then off to the garden with them!
Tune in tomorrow when I will hopefully share with you the wonderful progress my herb garden has made!
Monday, April 25, 2011
If Life Were Like The Movies...
...I would have been a florist. Well, actually, if life were like the movies (where everyone is beautiful, has plenty of money and plenty of spare time) there are a lot of professions I'd love, but florist is toward the top of the list. To feed my inner florist, I can often be seen tip toeing around my yard filling a basket full of clippings of this and that. I never know what I'm going to do with it until I am inside with my bundle of blooms and an assortment of bottles, but that is all part of the creative process.
I have discovered over the years that I have a certain aesthetic when it comes to flower arranging that comes partly from personal taste and partly from the reality of using garden blooms from my own yard.
First, I like mini-bouquets. This is because in addition to being adorable, they allow you to stretch the number of blooms you have (which can vary wildly between seasons). Instead of having one large lush bouquet on your kitchen table you can have five little ones scattered about your house, bringing little bursts of joy in unexpected places.
Third, I like to incorporate non-traditional plants. There are plenty of things growing in most peoples yards that they wouldn't think of as traditional choices such as herbs, horsetail reed and vining flowers. These work great to add a new texture to your arrangement or to simply act as filler around some beautiful flowers.
Lastly, and I suppose this is more of a recommendation, interesting containers are a good way to shake things up. When working from your garden you are going to be using the same types of flowers a lot, so different containers can add variety and pose fun new challenges. Thrift stores are a great place to look and don't just think traditional vases, old soup cans, canning jars, and carafes make great "vases" too!
 |
| Grandpa George plants and Chives |
 |
| Roses and Thyme |
 |
| Carnation and Mini Roses |
Second, I like tightly bunched short flower arrangements. Packing a large number of blooms into a tight space makes them pop and look far more lush and put together than a loose bouquet. Short arrangements are also easier to make because long straight stems are often not what you find when collecting garden blooms. I only go for sparse if I have a few particularly beautiful roses and an equally beautiful/interesting vase. In that case, I clip them at different heights and sort of let them lounge in their vessel.
 |
| Roses and Mint |
 |
| Roses and Lavender |
 |
| Grandpa George plants with Jasmine buds |
Wednesday, April 20, 2011
Rouge Tomato

For those of you who aren't familiar with the plant above, it is a tomato. Now before you call me silly for planting a tomato in the midst of my herb garden (which would totally destroy the herb garden theme) you should know, this was never meant to happen. I racked my brain trying to figure out how this ridiculously healthy looking tomato plant (it puts my intentional seedlings to shame) popped up in this location. I envisioned trixy little hobbitses running around my garden at night scattering seeds, or an equally trixy little Jeffry planting a single seed on purpose because it broke his heart to see it go to waste.
After much speculation, this is what I think happened. When I was putting the herb garden together, I stole some dirt out of my raised beds because it needed just a touch more in the elevated areas. A tomato must have fallen in the raised bed last year and decomposed, leaving its seeds behind in the soil. This seed was then transferred to my herb garden along with the soil, where it has been carefully watered and pampered along with the herbs. I have no idea what kind of tomato it will be. I think I shall try to transplant it to the tomato section of our yard and wait to be surprised!
Friday, April 8, 2011
Garden in Bloom
I've been meaning to post some pictures up all week, but getting ready for our Mexico trip has left me running out the door late in the morning and not finishing with stuff I need to get done until well after dark! Then last night of all things it was hailing when I got home! Luckily everything seems to have come through pretty unscathed so enjoy some lovely photos of Asbury Farms in bloom.
 |
| One seedling tray sprouting away. |
 |
| Strawberry blossoms waiting to transform into plump red fruits. |
 |
| Green strawberries ready to ripen. |
 |
| Tomatillo flowers. |
 |
| I love how tomatillos look like little paper lanterns hanging from the plant. |
 |
| I can't believe our citrus is already blooming again! |
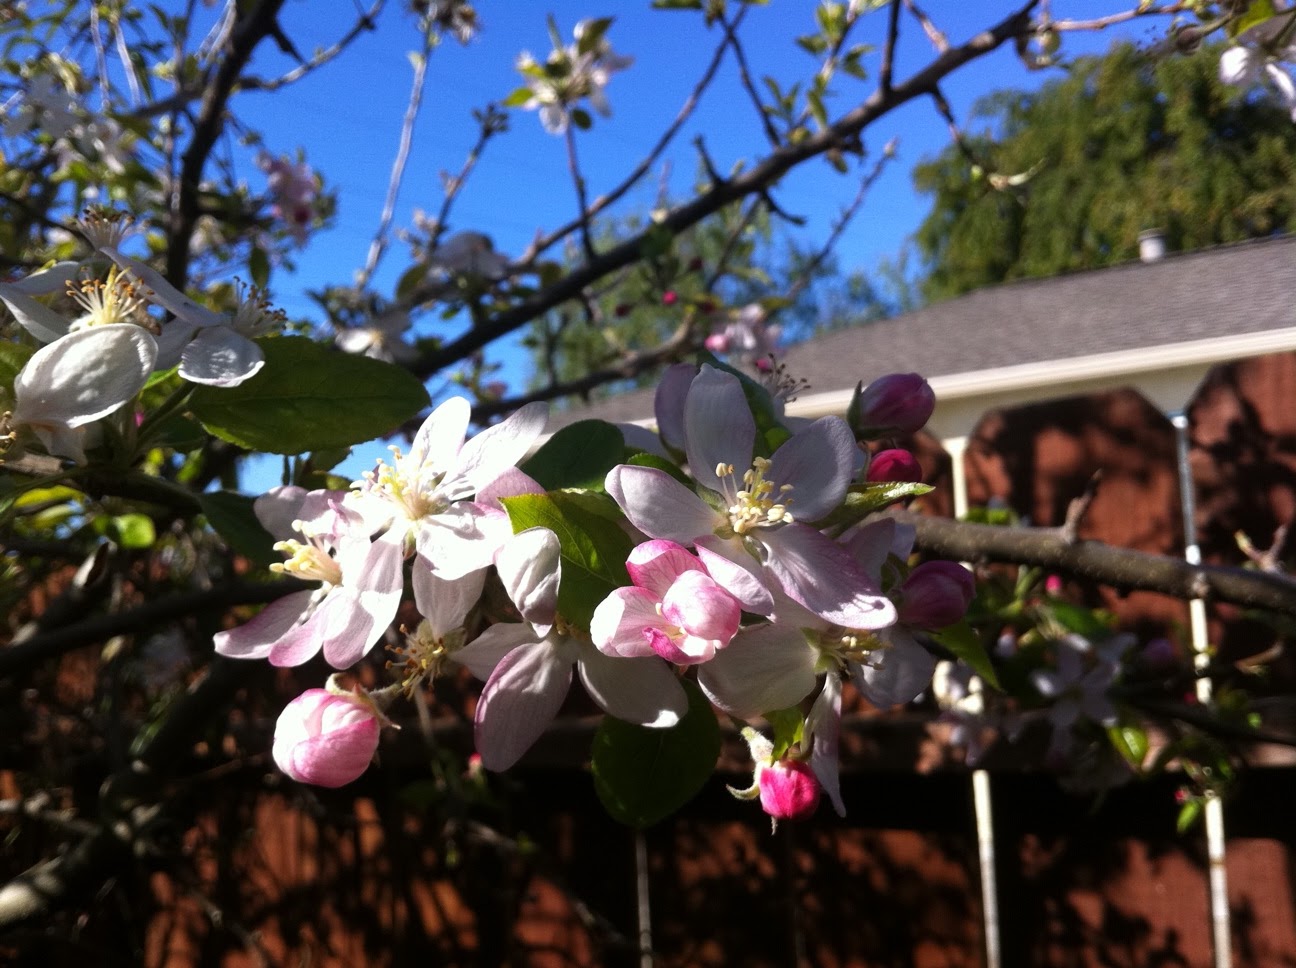 |
| Sweet apple blossoms outside our bedroom window. The bees are in heaven. |
 |
| English lavender. |
 |
| Our wild tangled mess of jasmine. The sent that greets my nose each morning when I go out to water. |
 |
| The first set of blooms on our double delights are especially red. By far my favorite flower in our garden. |
 |
| This ground cover has endured a winter's worth of attacks from Baby Chick and somehow still lives. |
Thursday, March 31, 2011
Liquid Chicken Fertilizer
Ok, so I must admit, I only started writing this post because it's the only thing I could think of to stop me from reading more baby blogs. I've been reading dearbabyblog.com for over a week now. While this woman's life is about as far from mine as I can imagine, I can't help but fall in love with her little family that is filled with all the happiness I hope to one day grow in my own home. She is also a proponent of many ideas I favor, cloth diapering, natural child birth, etc. so I have found her experiences most educational. If you find yourself suffering from a deficiency in cuteness, I recommend taking a little stroll through the pages of her blog.
Now, on to non-baby related topics, POOP. Yes you heard me right, P-O-O-P. It comes out of my chickens and sits there until Jeff or I clean it up. We honestly don't clean the coop out all that often. I had read from another blog/magazine/book (I can't really remember) where one woman says she just throws down a new layer of wood chips every now and again and then does seasonal cleanings of the coop. The new pine chips seal in the old ones and when you clean it out to throw in the composter, the bottom layers have already started breaking down. We have used this same method and found it to be easy on us and the chickens don't seem any worse for wear.
So right about now, as spring starts to take full bloom, it is time for another cleaning. I recently read an article in Mother Earth News which gives instructions for making homemade liquid fertilizers out of the wood chip/poo combination from chicken coops. It also had a fertilizer recipe involving urine (dilute it 1:20 with water and go to town if you're interested), but when Jeff asked, "where do you get the urine?" I figured we weren't ready to take that plunge yet.
So on to chicken poop. You fill a five gallon bucket 1/5 of the way with the chicken poo/wood chip combo and then fill with water. Let the mixture steep for three days (giving them an occasional swish) and then dilute your "tea" 1:1 with water and use as you would any other liquid fertilizer. I'm looking forward to not spending so much on my seaweed liquid fertilizer this year!
Oh and in case you're wondering, "where are the pictures?!" Well, many of you already know what chicken poop in a bucket looks like and would probably rather not be reminded, and for those who haven't you'd probably honestly rather not see it (which I'm happy about since I'd also rather not take my camera near that much poop). Of course there is at least one of you coughHelencoughcough that probably does have a morbid curiosity for pictures. If that turns out to be the case, you are more than welcome to come over next time we need to clean the coop!
Tuesday, March 29, 2011
All-In-One Wash
As most of you know Jeff and I will be shipping off to Mexico soon to spend a week cooking for 250 teenagers. While I still haven't gotten a handle on mentally preparing for being surrounded by 250 hormone crazed creatures for week, I have made some progress on the more tangible preparations.
The shower situation in Mexico will be, well, M*A*S*H-esk. There is a wooden stall with a hook on which you hang a sun shower. Since I will only have 2.5 gallons of warmish water to shower with, I figure time will be of the essence. Taking this into account, I was delighted to stumble upon Burt's Bees All-In-One wash. Considering it's a Burt's Bees product, the price of $4 a bottle is pretty reasonable, and I ordered a few to give it a try. The point of this soap is that it is made to wash everything from the top of your head to the tips of your toes. I assumed it might dry everything out a bit, but I'm not going for pretty in Mexico, just clean.
I was pleasantly surprised, however, after giving it a test run a few nights ago. It smells like you are walking through an herb garden in the middle of a pine forest. This smell does not linger after you wash so if it is a little much for you have no fear. It also is just conditioning enough that your hair and skin feel soft but not greasy afterwards! I really put it to the test too. I used it after doing a P90X work out and with mouse and hairspray that needed to be washed out. I've used it two nights now and I love it, five out of five stars. A lot of the reviewers said they use it for whenever they travel so that they only have to pack one bottle and I am definitely sold on it. This all-in-one wash takes care of four different containers that I would normally have to pack for a vacation, and since it only comes in 4 oz. bottles, it's a great travel size. I imagine it would also be good for young kids that you just want to get clean and out of the bath.
The only downside is I haven't been able to find it in any stores so shipping costs also have to be factored in.
Monday, March 28, 2011
Potting Shed Revisited
I must admit, I didn't really button up my potting shed before winter came. In fact, I kind of ignored it, piled more stuff in it and apparently threw some dirt around for good measure. The result of my behavior was that a few days ago when I went out to start some seeds, I was greeted by this...


So an hour and a half after I went outside to start some seeds I had swept, organized and generally restored my potting shed to it's former, pre-winter, glory. I threw away or recycled about half of the random plastic pots I had so they are now a more realistic and manageable pile.
The seed sewing itself only took about ten minutes, and I now have a nice little smattering of potential plants to enjoy this summer. I should have: 6 Love Lies Bleeding, 3 Golden Jubilee tomatoes, 3 Purple Russian paste tomatoes, 18 Rutgers tomatoes, 9 Mortgage Lifter tomatoes, 9 Amish Paste tomatoes, 9 Romain lettuce, 3 Pak Choi, 3 Cozella di Napoli (like a zucchini), 3 yellow peppers, 3 lemon balms and 3 butter crunch lettuces. I'm sure there will be many more seeds started over the coming month, but this is a nice smattering to get me started.
Oh and how early is too early to listen to christmas music? I'm not saying I was listening to it while I cleaned my shed, but if I was, would that be wrong? What if it was raining and felt christmas weatherish?

and a little of this...

and a very good reason why you shouldn't leave your pots all a jumble and ignored for extended periods of time is that they'll be full of this...

So an hour and a half after I went outside to start some seeds I had swept, organized and generally restored my potting shed to it's former, pre-winter, glory. I threw away or recycled about half of the random plastic pots I had so they are now a more realistic and manageable pile.
The seed sewing itself only took about ten minutes, and I now have a nice little smattering of potential plants to enjoy this summer. I should have: 6 Love Lies Bleeding, 3 Golden Jubilee tomatoes, 3 Purple Russian paste tomatoes, 18 Rutgers tomatoes, 9 Mortgage Lifter tomatoes, 9 Amish Paste tomatoes, 9 Romain lettuce, 3 Pak Choi, 3 Cozella di Napoli (like a zucchini), 3 yellow peppers, 3 lemon balms and 3 butter crunch lettuces. I'm sure there will be many more seeds started over the coming month, but this is a nice smattering to get me started.
Oh and how early is too early to listen to christmas music? I'm not saying I was listening to it while I cleaned my shed, but if I was, would that be wrong? What if it was raining and felt christmas weatherish?
Monday, March 14, 2011
Why You Clip A Chicken's Wings
I never thought I'd say this about a chicken, but as much as one can love something with a brain the size of a pea, I love Baby Chick. She's adorable, she comes running when she sees you come out the back door and she adorably shadows you as you do work around the yard. I mean come on. Look at that face.

But Baby Chick has a dark side. A quiet voice that lurks inside of her otherwise gentle body and tells her to do things. Bad Things.
Case and point, look at my beautiful barrel of carrots. Lush, beautiful, still in need of some maturing but holding the promise of sweet roasted carrots this spring.

They had grown so well in fact, that I had to thin them out and enjoy some wonderful baby carrot side dishes.
  |
| This photo makes me think of another article I read from a professional gardener who was contrasting what she normally looks like when she gardens, to what she looks like when she appears "gardening" on television and in magazines. The reality might not be pretty, but I think it has it's own charm. |
Baby chick has co-existed with these carrots beautifully for months. Never once has she jumped into these barrels to hunt for bugs or lay her eggs. I can only imagine The Voice returned to her. That it used its honeyed voice to convince her to do bad things again. I don't blame her, who could resist such a one as The Voice? This is what I found this Saturday, the dirty work of The Voice.

In order to protect our yard from future possessions of our otherwise docile chicken, we had to clip Baby Chicks wings. I feel bad, she doesn't understand why she must be exiled to the chicken coop when she obviously belongs with us. Well, I felt bad that is, until I found her still mysteriously able to get out into the yard. I can only assume The Voice was involved.
Wednesday, March 9, 2011
Herb Garden Beginings
Last weekend I finally took the first steps toward my new herb garden. I have wanted an herb garden in the little rectangular patch of dirt outside our front door for a while now, and in a way, I've had one. It was, however, a flawed herb garden. Sure it had the sage, thyme, marjoram, etc. that any good herb garden should have, but it was smushed in under a couple of rose bushes and two invasive plants that didn't really belong there. Let me tell you, getting caught on a rose thorn while quickly trying to grab some sage for the dinner you currently have cooking on the stove is no fun, no fun at all.
So after finally getting the blessing from my please don't prune or rip anything out husband, I took the first steps toward my new herb garden by ripping out everything that was currently there, which was quite a bit.

The only plant I felt bad about ripping out was the rose near the door. Every year it has given us a plethora of the most beautiful magenta roses you've ever seen. It was so pretty and healthy looking I had to stare at it for a few minutes before I could get the resolve to start hacking away at it. Here is a loving close up I took of it's leaves during this period of introspection and struggle.

I reget nothing else I did that day. In fact, tearing out the succulent that was next to this beautiful rose was down right fun. I hacked it to pieces with a hatchet, and every time the blade cut into the juicy leaves green ectoplasm came pouring out. It also smelled amazing, like a mix of fresh aloe and green beans. I imagine it would make a very refreshing sent for a soap. The thing was also huge (the picture below is just one of it's many heads) so it was quite the work out.

Two plants technically survived the slaughter that was reaped by my hatchet and shovel. The first is a plant whose name I can never remember, but that my family call grandpa George plants. It was found originally in our backyard in a pot, forgotten under a pile of over grown horsetail reed. It was then moved to the front yard, and now lives next to our raised beds. I wasn't very delicate with it, but this thing is a trooper and should do well in it's new home.

Upside down and waiting to go in it's new hole.
The other plant that survived was a little baby rose that i found hiding behind the big ones. I didn't know roses grew little babies, but it was saved and put in a pot in hopes it will some day find a new home. I'm not a monster after all. Who could kill a baby rose?
Now that my slate is clear, I am ready to plan the herb garden. I've done a few sketches of what I envision for it. I want a little path with three stepping stones going down the middle. Looks wise, I'd rather have no path, but without it I'd have a hard time reaching all the herbs. Around the stepping stones I'm thinking either the low creeping mint or baby's tears. Then I want the ground to slope up to mounds on either side of the path where the herbs will be planted. I'll play around with it a bit once I get the plants and dirt, but I'm thinking the herbs should be oriented towards the path in arches. You can see some drawings that make this clearer bellow.
 |
Birds eye view |
 |
| ground view |
If anyone has any suggestions or herb recommendations I'd be glad to hear them!
Thursday, March 3, 2011
Creamed Whiskey
A Little Ramble Before We Begin
I have found that writing a blog often puts one in the situation of asking why. For example, why did I decide to bake a cake at 10 pm when I am supposed to be on a diet, or why am I making twice as much work for myself by having to constantly wash my hands so that I can take pictures? The answer to these types of questions is generally something along the lines of because I love to do domestic things and I love to write, and to do the latter I must do the former and to do the former I must force myself to find the time. Then however, there are these other types of questions. For example, why did I decide to pull out the crystal champagne coupes for this picture, why did I decide to take it on a bookshelf and best of all why did I wait until 9:00 am as I was getting ready for work to do my taste test of the different creamed whiskey's I'd made? Well, I don't really have a good answer to any other those, especially the last one, but I can assure you that somehow it all works out and I'm most appreciative that you all seem to just go along with it. Especially my husband who caught me in the kitchen this morning drinking booze. Thanks for understanding.
And Now, The Whiskey

Note: You don't need a great whiskey for this. Put the cork back in the 12 year McCallan and pull out the Bushmills.
A simple internet search can pull up many recipes for homemade versions of Baileys, but most of them are pretty similar. The biggest difference seems to be whether people added eggs or not. I decided to not bother with the recipes that had eggs in them because it would drastically shorten the shelf life of my beverage, and despite what you might have been told, I can't drink a whole jug of Baileys in a week. I did decide to try two different batches, one sweetened with honey and one with condensed milk, to see if one yielded noticeably better results. I got the idea after reading that Carolans (my personal favorite) uses honey in the production of their creamed whiskey. I thought that a rich dark honey could add an earthy flavor to the mix.
I also changed my recipe from the norm by omitting or substituting a couple ingredients in both batches. First, most recipes call for instant coffee powder to be added. This kind of grossed me out. I said thanks but no thanks. While I don't doubt the addition of coffee flavoring would be good, I just have a mental block against using instant coffee. If you have an espresso machine though, a shot added to the batch could be quite good. Second, all the recipes call for chocolate syrup. I don't own any chocolate syrup, so I melted the equivalent amount of bar chocolate and added that. It mixes in just fine and doesn't separate back out once the mixture is chilled. Third, while both batches I made have almond extract in them, I would leave it out next time, or just add the tiniest splash. It has an overwhelming scent and the taste leaves the kind of burn in the mouth feel that bad whiskey does. Now granted, I was also using bad whiskey, but when I sampled the batch before adding the almond extract, the taste was far less pronounced.
Alright, now that I have taken you on the journey of exploration that is creamed whiskey making, here's the recipe I worked out.

Ingredients
1 cup of heavy cream
1 14 oz. can condensed milk
1 3/4 Cups Irish Whiskey
2 Tsp. vanilla extract
2 Tbsp. melted chocolate/chocolate syrup
Optional Additions
1 shot of espresso
1/2 Tsp. almond extract
Directions
Mix all ingredients in a blender for 30-60 seconds until well combined. Pour into a tight sealing, preferably cute, jar and place in the fridge to chill.

Now you may remember I said I tried two batches but only gave one recipe. What's up with that?! Well, I found the honey version to not be noticeably different taste wise. If you wish to make that version, substitute the condensed milk for 2/3 cup of honey. This will however, be more expensive than using the condensed milk. I wouldn't have tried it if I didn't have an over abundance of honey at the moment. In addition to not changing the flavor, I found the honey version to be a little less pleasing in terms of mouth feel. The version with condensed milk feels creamier and fuller, while the honey version feels a little weak and thin. Finally, the honey version also separates out and doesn't look as nice as the condensed milk version in the fridge. Of course a good shake can take care of that. So experiment, it's up to you!
Friday, February 25, 2011
Lemon Curd
In the continuing what can I do with all these lemons saga, I decided to try my hand at some lemon curd. I had read a blog a while back about making curds and had filed it away under the someday category of my brain but I had honestly forgotten about it as I stared at my pile of lemons over the last couple of weeks. I had been waiting for them to speak to me, like a sculptor staring at a blank rock waiting for it to tell him what it's meant to be. Then, a week ago I had a baking day with some friends, one of whom brought a jar of lemon curd her mother had made. Suddenly that filed away blog post came running back into my mind and I felt silly for not having remembered it earlier. A brief Internet search later I marched into my kitchen with a recipe in one hand and a basket of lemons in the other, ready to create that beautiful mixture of sunshine and happiness that is lemon curd.
Before I launch into the recipe, I know some of you may still be stuck thinking, lemon what? Lemon curd, which is sometimes also referred to as lemon cheese, became popular in England and America in the 1800s as an accompaniment to toast, scones, muffins, etc. during afternoon tea. It can also be used as a filling for cakes and tarts. The most popular form in which you are most likely to have encountered it is in lemon meringue pie, the bottom half of which is lemon curd. Lemon curd is similar to lemon custard, but curds contain more juice and zest than custards, which makes their flavor more intense. Oh and just in case you aren't particularly fond of lemon, curds can be made with any citrus and even other fruits such as blueberries and raspberries!
Lemon Curd aka Sunshine on a Spoon
recipe from Fine Cooking
Ingredients
6 Tbsp. soft unsalted butter
1 cup of sugar
2 whole eggs
2 egg yolks
2/3 cup of lemon juice
1 tsp. lemon zest
Directions
1) In a large bowl beat the sugar and butter together with an electric mixer for about 2 minutes.

3) Beat mixture for 1 minute then add the lemon juice. Be sure to strain the lemon juice to get all the bits of pulp out so your curd comes out smooth. Cheese cloth works great for that.

4) Heat the mixture in a non-reactive pan over medium heat for about 15 minutes stirring gently but constantly. Do not let the mixture boil. The curd is done when it reaches 170 degrees or when it has thickened significantly and your finger leaves a path through it on the back of a spoon.

5) Remove curd from heat and add zest. Allow to cool slightly then transfer to a bowl and cover with plastic wrap so that the wrap is touching the curd. This will prevent a skin from forming on top of the curd as it cools. Refrigerate overnight and then transfer to permanent lidded containers such as canning jars.
 *Notes
-When you first add the lemon juice the mixture may curdle a bit, don't worry, it'll all melt together.
-The curd is very hot at 170 degrees. Be prepared for it to hurt your finger if you use the spoon test.
-This batch should make roughly two cups of curd (total estimate, I didn't measure).
- Curd will keep in the fridge for a couple weeks, or you can freeze it and use it over the next six months or so.
-Be careful when heating your curd that you don't overcook it. It quickly goes from being about 150 to being 170. I got surprised by that and ended up cooking mine up to about 180. It tastes fine, just not quite as awesome as it would have.
Before I launch into the recipe, I know some of you may still be stuck thinking, lemon what? Lemon curd, which is sometimes also referred to as lemon cheese, became popular in England and America in the 1800s as an accompaniment to toast, scones, muffins, etc. during afternoon tea. It can also be used as a filling for cakes and tarts. The most popular form in which you are most likely to have encountered it is in lemon meringue pie, the bottom half of which is lemon curd. Lemon curd is similar to lemon custard, but curds contain more juice and zest than custards, which makes their flavor more intense. Oh and just in case you aren't particularly fond of lemon, curds can be made with any citrus and even other fruits such as blueberries and raspberries!
Lemon Curd aka Sunshine on a Spoon
recipe from Fine Cooking
Ingredients
6 Tbsp. soft unsalted butter
1 cup of sugar
2 whole eggs
2 egg yolks
2/3 cup of lemon juice
1 tsp. lemon zest
Directions
1) In a large bowl beat the sugar and butter together with an electric mixer for about 2 minutes.
2) Slowly add the eggs and yolks. Fully incorporate each egg/yolk before adding the next one.


4) Heat the mixture in a non-reactive pan over medium heat for about 15 minutes stirring gently but constantly. Do not let the mixture boil. The curd is done when it reaches 170 degrees or when it has thickened significantly and your finger leaves a path through it on the back of a spoon.


-When you first add the lemon juice the mixture may curdle a bit, don't worry, it'll all melt together.
-The curd is very hot at 170 degrees. Be prepared for it to hurt your finger if you use the spoon test.
-This batch should make roughly two cups of curd (total estimate, I didn't measure).
- Curd will keep in the fridge for a couple weeks, or you can freeze it and use it over the next six months or so.
-Be careful when heating your curd that you don't overcook it. It quickly goes from being about 150 to being 170. I got surprised by that and ended up cooking mine up to about 180. It tastes fine, just not quite as awesome as it would have.
Thursday, February 24, 2011
Lemon Pickles
There is a blog I very much enjoy reading called Tigress in a Pickle. While I rarely get to pickle things because I live with a pickled food hater (and pickling for one seems like a lot of work), I still enjoy reading her always interesting recipes and partaking of her brief but witty posts. She does a lot with Indian flavors which I find rather interesting, and when she posted about Indian sun pickles I just had to give them a try.
You see, I have a plethora of lemons from my lemon tree/bush right now and have been at a loss for what to do with them. One can only drink so much lemon aide and I already have a batch of limoncello steeping! If you do not find yourself in my position, I'm pretty sure you probably have a neighbor who is and would love to unload some produce on you. If, however, you're neighbor is a stingy mean old man who would rather see his lemons rot on the ground than give a few to you, just remember, the cover of darkness is your friend.
These sun pickles also don't really resemble what westerners would consider to be a pickle, so I think Jeffry will find them tasty. Sun pickles are like preserved lemons, but with more interesting flavors than salt and cinnamon. The lemon juice and good old fashion sunshine are what pickles the lemons, so no vinegar taste here. I'm not entirely sure what I will do with these once they are done, but the Tigress recommends chopping them up and mixing them with some basmanti rice and a dollop of yogurt on the side. I figure I'll start there and then begin experimenting. Perhaps some mixed in with fresh steamed cauliflower? I halved her original recipe to be more realistic with my uses. Whether one is canning, gardening or crafting it's always important to keep your production in line with reasonable use (are you really going to use 30 handmade doilies?). No point in storing two liters of pickled lemons in your fridge if you're not sure you're even going to like them. If you do end up loving them, you can always make more!
 Sweet n' Spicy Lemon Pickle
from tigress in a pickle
Ingredients
Directions


You see, I have a plethora of lemons from my lemon tree/bush right now and have been at a loss for what to do with them. One can only drink so much lemon aide and I already have a batch of limoncello steeping! If you do not find yourself in my position, I'm pretty sure you probably have a neighbor who is and would love to unload some produce on you. If, however, you're neighbor is a stingy mean old man who would rather see his lemons rot on the ground than give a few to you, just remember, the cover of darkness is your friend.
These sun pickles also don't really resemble what westerners would consider to be a pickle, so I think Jeffry will find them tasty. Sun pickles are like preserved lemons, but with more interesting flavors than salt and cinnamon. The lemon juice and good old fashion sunshine are what pickles the lemons, so no vinegar taste here. I'm not entirely sure what I will do with these once they are done, but the Tigress recommends chopping them up and mixing them with some basmanti rice and a dollop of yogurt on the side. I figure I'll start there and then begin experimenting. Perhaps some mixed in with fresh steamed cauliflower? I halved her original recipe to be more realistic with my uses. Whether one is canning, gardening or crafting it's always important to keep your production in line with reasonable use (are you really going to use 30 handmade doilies?). No point in storing two liters of pickled lemons in your fridge if you're not sure you're even going to like them. If you do end up loving them, you can always make more!

from tigress in a pickle
8 small very fresh lemons, no blemishes
2 small lemons, juiced
1 Tbsp. cayenne powder1 cup lightly packed brown sugar
1.5 Tbsp. sea salt
.75 Tbsp. whole fennel seeds.75 Tbsp. whole cumin seeds
.5 Tsp. whole fenugreek seeds
.75 Tbsp. whole peppercorns
1 liter jar with a tight fitting non-reactive (no metal) lid (I got my jar at cost plus, but I imagine ikea carries some good options too)
Directions
1) Wash your lemons and scrub any dirt off them. Make sure they are completely dry before moving to step two. Any water or yuck on your lemons could add to the risk of the batch going bad as it pickles.

2) Roast the fennel, cumin and fenugreek seeds in a dry pan over medium heat for a few minutes until they turn a shade darker and start to give off a toasty aromatic smell. Careful not to burn them. Once toasted, remove from the pan and grind the toasted seeds along with the salt and peppercorns. You can do this with a spice grinder or a mortar and pestle. This is a good task for your spouse/helpful friend while you do work on #3.
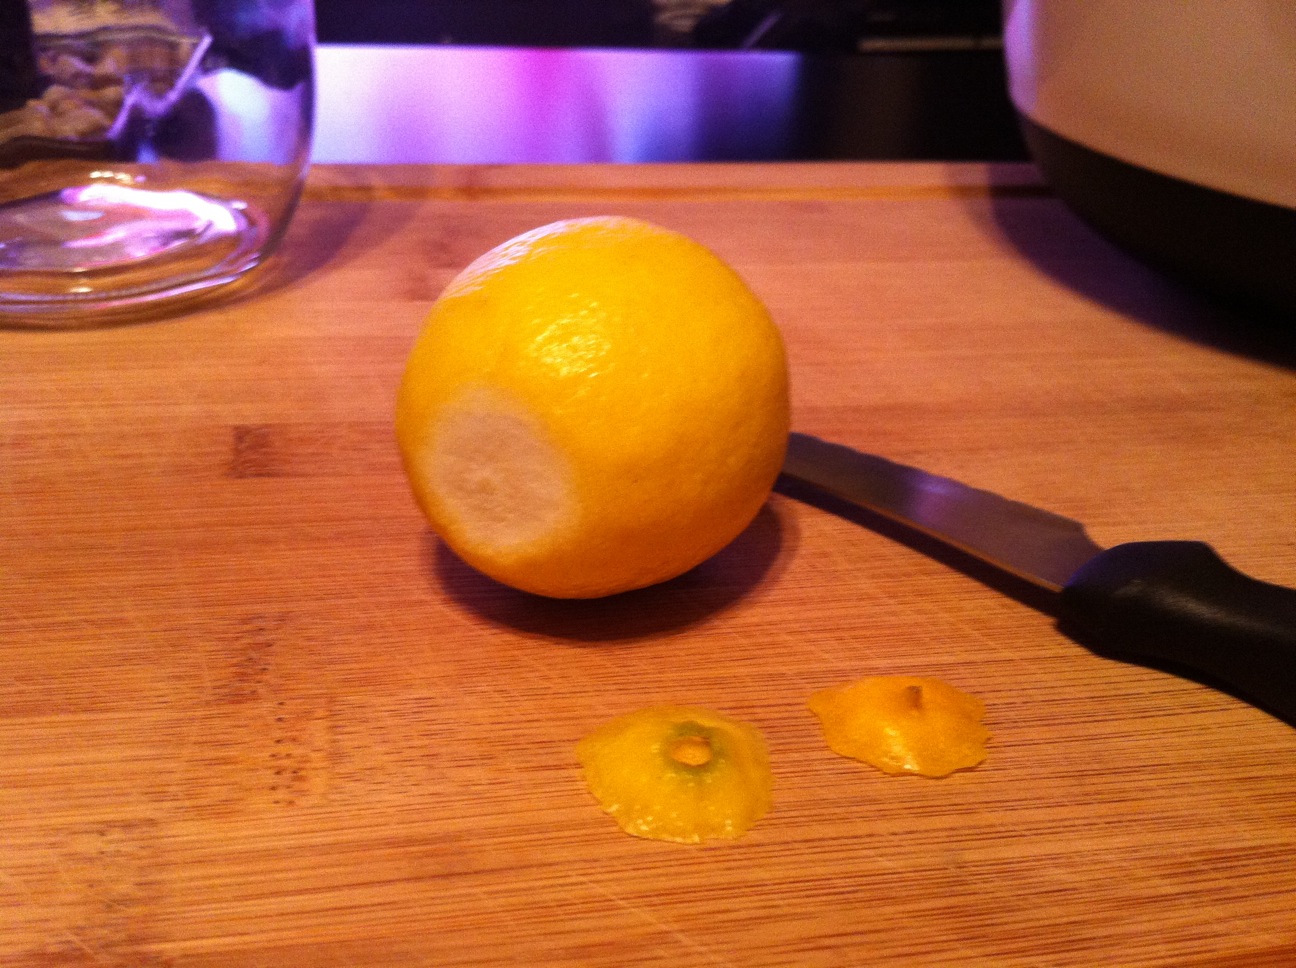
3) Cut off the two bump or scar ends on the lemons. Then cut them into medium sized chunks. I quartered mine, then sliced each quarter into two or three pieces. Remove any big seeds you find.
4) Mix your ground spices with the brown sugar and cayenne pepper.
5) Fill your very clean, very dry jar half way with lemons. These will shrink a lot over the next few days so don't be afraid to really pack them in there. Pour half the spice mixture over them and fill the jar the rest of the way with lemons. If your jar isn't full, you can always add more lemons than the recipe calls for. Top with the remaining spice mixture and the juice from two lemons.
6) Close the lid and shake vigorously!
7) Place jar in a sunny window for 8 weeks and shake once a day to distribute the spices. After the 8 weeks you can place the jar in the fridge where it should keep for a year.

*Notes
-Fenugreek is an indian spice and I highly recommend buying from a food co op. A whole jar of spices from the bulk bin at a co op costs about 50 cents. Refilling your spice jars from the bulk bins will save you a TON of monies.
-You can check the mixture at 7 weeks to check for doneness. If the liquid has thickened and the skins are soft they are done and can be put in the fridge.
-You can check the mixture at 7 weeks to check for doneness. If the liquid has thickened and the skins are soft they are done and can be put in the fridge.
Subscribe to:
Posts (Atom)


