Showing posts with label Plants. Show all posts

Thursday, October 18, 2012

Prickly Pears: A How To

I've never been a big cactus fan, but we inherited a group of prickly pear bushes that were growing in our chicken run when we bought the house (you can probably scavenge them around your area too if you look hard enough). As my husband hates to pull up any green and growing thing, I have to pick my battles on what I try to get rid of. This year however, I gotta say I had fun harvesting and processing the fruit with him. It's been a long while since he and I were able to work on a food/garden project together because someone usually has to be keeping an eye on the Wee One. Claire was a good girl for this project though, and went down for her nap when we started and woke up from it just as we were cleaning up.

The biggest thing to deal with when working with prickly pears are the thorns. Its not so much the big obvious thorns that will get you. What you need to be concerned with is the layer of fine as peach fuzz thorns that also cover the fruit. How to get rid of all of these thorns is the subject of this post, along with lots of fun pictures involving fire and the like.

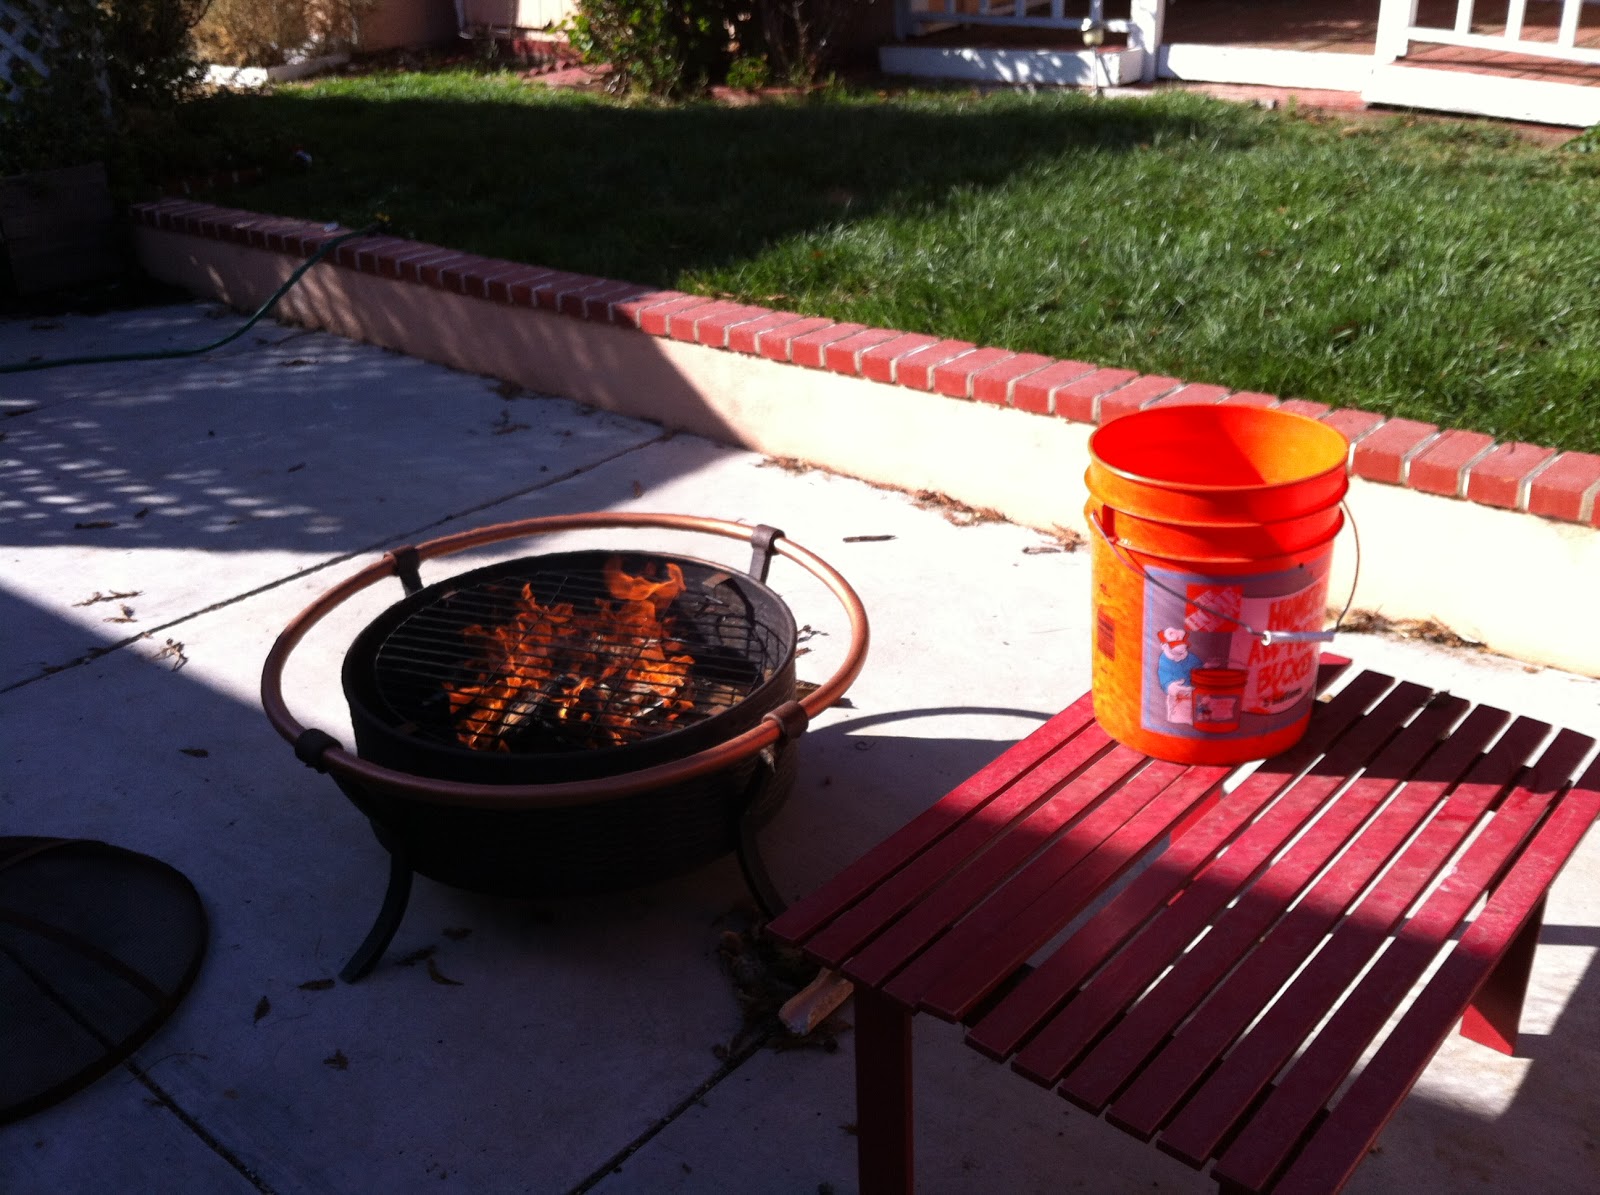
After a little online research, Jeff found the best way to get rid of the thorns was fire. Other ways that people take care of them is by rolling them in sand or straw/weeds. Fire won for many reasons like it sounded more fun, less labor intensive, more effective at getting rid of all those little buggers that are so fine you can't see them and we happened to have a fire pit full of wood in our back yard. The Internet recommended using a blow torch, but I think our way was more romantic and probably the way great grand pappy would have done it. Well, that is if our great grand pappy's were a little less European.

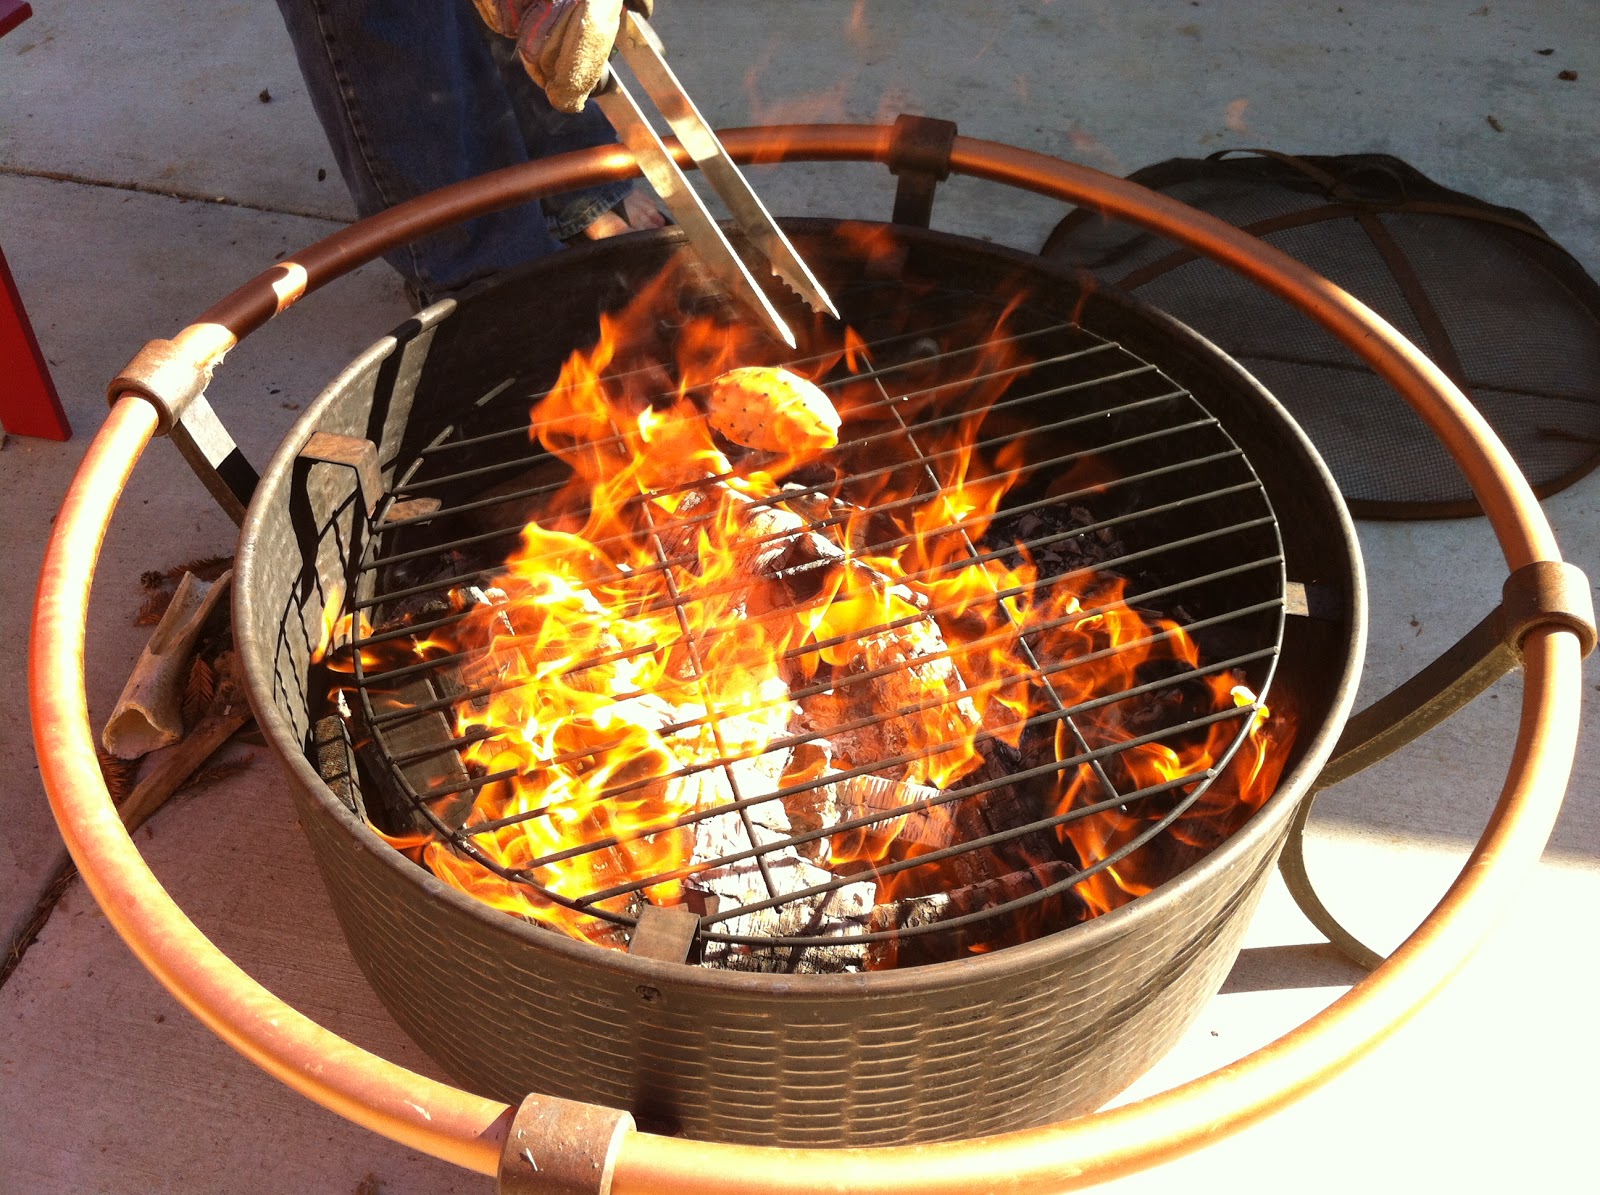
The basics of the process is as follows.

1) When your prickly pears have turned a nice red color, carefully pick them with a pair of tongs. We found the kind you'd use in the kitchen (as opposed to BBQ tongs) worked best for this step. The fruit will be pretty delicate so just gently twist and pull until it pops off. DO NOT TOUCH THE FRUIT WITH YOUR BARE HANDS!!

2) Whatever fire source you are using needs to be big in the flames department. You want them to actually lick the fruit. Using BBQ tongs, roll your fruit around in the flames until the skin becomes shiny and a little dark. Be sure to pay special attention to the ends of the fruit where the big thorns are. Heavy gloves to protect your hands from the heat are recommended.

3) Place your fruit in a bucket of icy water to cool.

4) Peel the fruit by cutting off the ends and then running your knife along the sides. The skins should come off pretty easily.

And that's all it takes my friends! This was effective enough at taking off the thorns that I didn't wear any gloves to peal them. I'd be lying if I said no thorns poked me, but after a good hand washing they seemed to all come out. We harvested five gallons of prickly pears and juiced them. In my next post I'll let you know what we made with them!


After a while we realized doing one at a time was a waste of time.


Well I'm pretty sure my grandpa never juiced prickly pear back in his day, but this juicer of his still has a lot of life left in it.

 
The final product.


Friday, July 20, 2012

Garden Update

My long suffering garden is in full swing right now. We've had our first fresh made pasta sauce of the season, enjoyed quite a few zucchini breads and I'm thinking tonight I shall turn some of our tomatoes, bell peppers and onions into pico de gallo. As you can see from earlier blog posts we also have been enjoying fresh strawberries over cake, dipped in chocolate, warm and unwashed standing in the front yard, etc.
I didn't expect these to start our so neon yellow. They will eventually turn a deep orange.

There are two plants I'd like to high light in this post because I'm very excited about them. The first is our Cinderella pumpkins. I swear these squash grow so fast you can see it happening. I guess that makes sense since they are going to get pretty big (up to 25 lbs.). I imagine there are going to be a lot of pumpkin recipes posted here when fall comes. I'm particularly fond of winter squash in Thai curry so I'm sure that's where a lot of it will end up. The pumpkins vines are huge as well. We've had to continually redirect themto keep them from climbing up our palm tree. One vine is even making a run for the other side of the yard by creeping across the path that separates our raised beds from our squash bed.


The second plant I'm really excited about is our eggplant. I bought these on a whim and was pretty certain they wouldn't do well in our chilly climate. I planted them up against the house because even though that area doesn't get a ton of sun, the house traps heat and keeps that area warmer as the general air temperature cools. So far I've counted five egg plant growing away out there. Inspired by some of David Lebovitz's most recent blog posts about a trip to Israel, I think I might try and BBQ some of these once they're mature. I think the smokiness of a charcoal fire would pair well with the already smokey flavor of eggplant.

Friday, April 8, 2011

Garden in Bloom

I've been meaning to post some pictures up all week, but getting ready for our Mexico trip has left me running out the door late in the morning and not finishing with stuff I need to get done until well after dark! Then last night of all things it was hailing when I got home! Luckily everything seems to have come through pretty unscathed so enjoy some lovely photos of Asbury Farms in bloom.


One seedling tray sprouting away.


Strawberry blossoms waiting to transform into plump red fruits.

Green strawberries ready to ripen.
Tomatillo flowers.
I love how tomatillos look like little paper lanterns hanging from the plant.


I can't believe our citrus is already blooming again!


Sweet apple blossoms outside our bedroom window. The bees
are in heaven.

English lavender.
Our wild tangled mess of jasmine. The sent that greets my nose each
morning when I go out to water.
The first set of blooms on our double delights are especially red.
By far my favorite flower in our garden.
This ground cover has endured  a winter's worth of
 attacks from Baby Chick and somehow still lives.

Monday, March 28, 2011

Potting Shed Revisited

I must admit, I didn't really button up my potting shed before winter came. In fact, I kind of ignored it, piled more stuff in it and apparently threw some dirt around for good measure. The result of my behavior was that a few days ago when I went out to start some seeds, I was greeted by this...


and a little of this...


and a very good reason why you shouldn't leave your pots all a jumble and ignored for extended periods of time is that they'll be full of this...


So an hour and a half after I went outside to start some seeds I had swept, organized and generally restored my potting shed to it's former, pre-winter, glory. I threw away or recycled about half of the random plastic pots I had so they are now a more realistic and manageable pile.

The seed sewing itself only took about ten minutes, and I now have a nice little smattering of potential plants to enjoy this summer. I should have: 6 Love Lies Bleeding, 3 Golden Jubilee tomatoes, 3 Purple Russian paste tomatoes, 18 Rutgers tomatoes, 9 Mortgage Lifter tomatoes, 9 Amish Paste tomatoes, 9 Romain lettuce, 3 Pak Choi, 3 Cozella di Napoli (like a zucchini), 3 yellow peppers, 3 lemon balms and 3 butter crunch lettuces. I'm sure there will be many more seeds started over the coming month, but this is a nice smattering to get me started.

Oh and how early is too early to listen to christmas music? I'm not saying I was listening to it while I cleaned my shed, but if I was, would that be wrong? What if it was raining and felt christmas weatherish?


Wednesday, March 9, 2011

Herb Garden Beginings

Last weekend I finally took the first steps toward my new herb garden. I have wanted an herb garden in the little rectangular patch of dirt outside our front door for a while now, and in a way, I've had one. It was, however, a flawed herb garden. Sure it had the sage, thyme, marjoram, etc. that any good herb garden should have, but it was smushed in under a couple of rose bushes and two invasive plants that didn't really belong there. Let me tell you, getting caught on a rose thorn while quickly trying to grab some sage for the dinner you currently have cooking on the stove is no fun, no fun at all.

So after finally getting the blessing from my please don't prune or rip anything out husband, I took the first steps toward my new herb garden by ripping out everything that was currently there, which was quite a bit.


The only plant I felt bad about ripping out was the rose near the door. Every year it has given us a plethora of the most beautiful magenta roses you've ever seen. It was so pretty and healthy looking I had to stare at it for a few minutes before I could get the resolve to start hacking away at it. Here is a loving close up I took of it's leaves during this period of introspection and struggle.


I reget nothing else I did that day. In fact, tearing out the succulent that was next to this beautiful rose was down right fun. I hacked it to pieces with a hatchet, and every time the blade cut into the juicy leaves green ectoplasm came pouring out. It also smelled amazing, like a mix of fresh aloe and green beans. I imagine it would make a very refreshing sent for a soap. The thing was also huge (the picture below is just one of it's many heads) so it was quite the work out.


Two plants technically survived the slaughter that was reaped by my hatchet and shovel. The first is a plant whose name I can never remember, but that my family call grandpa George plants. It was found originally in our backyard in a pot, forgotten under a pile of over grown horsetail reed. It was then moved to the front yard, and now lives next to our raised beds. I wasn't very delicate with it, but this thing is a trooper and should do well in it's new home.

Upside down and waiting to go in it's new hole.

The other plant that survived was a little baby rose that i found hiding behind the big ones. I didn't know roses grew little babies, but it was saved and put in a pot in hopes it will some day find a new home. I'm not a monster after all. Who could kill a baby rose?

Now that my slate is clear, I am ready to plan the herb garden. I've done a few sketches of what I envision for it. I want a little path with three stepping stones going down the middle. Looks wise, I'd rather have no path, but without it I'd have a hard time reaching all the herbs. Around the stepping stones I'm thinking either the low creeping mint or baby's tears. Then I want the ground to slope up to mounds on either side of the path where the herbs will be planted. I'll play around with it a bit once I get the plants and dirt, but I'm thinking the herbs should be oriented towards the path in arches. You can see some drawings that make this clearer bellow.


Birds eye view


ground view

If anyone has any suggestions or herb recommendations I'd be glad to hear them!

Wednesday, March 31, 2010

Burning Hearts

I have been a fan of bleeding hearts for some time now and recently planted two outside of my bedroom window. While I love them, I now wish to rip them out viciously and plant Burning Hearts in their place! You can see a little post about them on Sunset's website here. In case you are feeling too lazy to follow that link, I stole their picture.

And who wouldn't love to say, "I have a bed filled with Burning Hearts outside my bedroom window." Oh my, how delightful. Mwahahahaha. If anyone sees these at a nursery near them, could you pick me up two?

Monday, October 12, 2009

Pitcher Plant

About a year ago, i saw the most beautiful giant red pitcher plants at Trade Joe's. There were striking and intense and looking back on it, only $8. Unfortunately, I was feeling particularly cheap or poor that day and I passed. I though to myself, "maybe next time." But there never was a next time. The next time I went into Trader Joe's there were gone, never to be seen again.


Yesterday when I went to Trader Joe's I saw that they once again were carrying pitcher plants. Perhaps they are not veined with as much scarlet as the ones I saw last year, and perhaps they are not as big, though they are the same price :-( , but alas I could not make the same mistake twice. So I bought myself the pitcher plant and painfully passed on the wonderfully eery corkscrew grass (maybe next time). So now my desk has a lovely decoration which I think is fitting for the Halloween season.


Carnivorous plants need a lot of water since they are generally found in boggy locales. To give my plant that boggy place to call home I am using a self watering pot. As you can see in the picture, three is a circular pot which rests inside of the square one. The circular pot is very porous so it allows the water which fills the square pot to seep into it. I'm hoping this will keep my carnivorous new friend nice and happy!


Friday, October 9, 2009

Fall Color

I stumbled upon a California native this week that is the cure for those who misses the brilliant fall colors of back east. Its called Roger's Red and it's a grape vine! This little vine will grow three to six feet each year, produce seedy grapes for the birds to eat, and best of all it turns a brilliant red in the fall. I haven't see one in person yet but I'm already thinking of places I could put one of these beauties as soon as I find it! Click here to learn more about this plant.

Wednesday, August 26, 2009

Garden Happenings

I love watering days in my garden. Sure its takes a lot of time and it is sometimes heavy and hot, but I like to spend some quality time with each plant. Today I thought I'd share some pictures of a few of the things I discovered while watering today.

First, my borage has begun to flower. Borage is a plant that is originally from Syria but is now found all around the Mediterranean, the Middle East, North Africa, Asia Minor and South America! Recipes involving this little flower are found from Poland to Persia. The flower itself tastes like a cucumber. The leaves are also used, especially in Iran, to make a deep purple tea.


While watering my seedlings, I also discovered that many of the little guys had started to develope their first set of real leaves. For the most part, when seedlings sprout their first two leave look very similar no matter what the plant is. Its when their second set of leaves start to grow that they begin to resemble their mature shape. Here is a future cabbage.


Here is another one of my seedling groups. Peas are a great thing to grow because they sprout pretty fast compared to other seeds and give the gardener an early sense of accomplishment as he/she waits for the rest of the seeds to sprout. I also like that they are robust looking from the second they shoot out of the soil. These will soon be planted around my tomato cages. I'm hoping the tomatoes will shade them until the weather gets cooler. In the past I've had bad luck with my peas getting burnt up. Also, a good tip for grown peas is to soak them in water for about 8 hours before planting. Bad seeds will float on top while good ones sink. This hydration also gives them a head start once you plant them.


Now if you're really in the market for instant gratification (or as close as you can get with seeds) grow a pot of radishes. They sprout in a day or two and are ready to eat in a month. Also, when you thin the seedlings, you can eat them in salad whole, leaves and all. They taste just like mini-radishes. I'm going to try these guys thinly slices on a baguette (or perhaps an herbed bread) with a little salt and butter when they grow up! Also, you can steam the mature radish greens and treat them like you would any other cooked green (Kale, Collard, Mustard, etc.).


Lastly, all this garden happiness doesn't mean there isn't tragedy. This winter squash was my pride and joy and month ago. Lush, beautiful and thriving it was, but now, dieing. It has been on the decline for the last several weeks. I've tried more water, I've tried less. I think the soil might be to blame. My soil is about 20% good dirt, 30% clay and 50% chunks of concrete that the builders buried when they build the neighborhood. This means I try to avoid planting too much in the ground because it requires a lot of bags of new dirt and hiding places for all the garbage I dig out. Alas, I think this winter squash has come to the end of the road.


Well thanks for taking a tour of some of my plants with me. Hope all is well in your gardens!