Tuesday, December 29, 2009

A Slice of Organic Life


Well friends, I had no school or work today and I'm sick. This means I spent most of the day going through the book I got Jeffry for Christmas A Slice of the Organic Life edited by Sheherazade Goldsmith. Actually, I started last night by doing a basic breeze through most of the book to get a feel for it. Then this morning I started going through with little pieces of post-it notes marking things I found of interest (yes I miss school research). Jeff and I first encountered this book over a year ago at the embarcadero down in SF. Since then, this book seemed to follow us and would pop up at little book stores we visited. We'd always thumb through it but walk away for some reason. I final decided to end the chase and ordered it off amazon for him for Christmas.


This book isn't exactly what I thought it would be, odd considering how much I had already looked through it. Instead of being in depth into any one thing, it is exactly what it's title says, a little slice of everything you need to know to start living a more organic responsible lifestyle. For this review I think a simple pro and con list will be helpful.

Pro
- Beautiful pictures and presentation.
- Good general overview about ways to rethink your lifestyle. Covers everything from shopping to child rearing to pest control to gardening and animal husbandry to construction projects.
-Promotes reusable diapers!!! (I don't know why I'm so into that)
-Provides some good recipes for each section whether it's bath time or herbal flea collars
-Contains a great index and list of resources related to topics discussed in the book, especially websites that go into more depth on specific issues or provide links to community organizations.

Con
-Layout doesn't follow logic, you can find information about organic bathing products in at least four different places. I have not idea why they aren't grouped together.
-Can feel a little preachy and make the reader feel guilty at times.
-Doesn't go into great detail. Will not work for a real how-to guide, but it does point you in the right direction.

In short, I think that this is a great book for a young family that wants to rethink their lifestyle and try to make some little changes here and there that will improve both their lives and the environment. This is not a good book however, if you lean to the Right (note the preachy con). I'm generally somewhere in the midlands between Right and Left but there were a few sections even I skipped more because I got the point already. This book also isn't very useful if you are already fairly knowledgeable in the subject. It is a fun read however, so I definitely think it's worth a look. It sort of feels like reading a string of Sunset articles (that's suppose to be a compliment).

Here are a few tips I learned:
1) If you are adding essential oils to a bath, first mix it with one tablespoon of milk. The fats in the milk act as a carrier to distribute the oil evenly.
2)Using reusable diapers is safer for babies skin because disposables are so absorbent that parents often leave them on longer than they should because they feel dry. This results in extra diaper rash.
3) Instead of paying $14 a bottle for face lotion or if you misplace your bottle, go into the kitchen and grab the olive oil. Wet your hands and then put a few drops of oil on them and rub it on your face. It doesn't feel greasy at all. I will enjoy saving that extra cash! Other good oils to consider are emu, jojoba, avocado, coconut and almond oil.
4) Store clothing made of natural fibers with a lavender sachet to keep bugs away.
5) Ants don't like herbs such as sage, mint, thyme or bay so if you crush them in their path or rub them on the area where they enter your home it will act as a deterrent.
6) Both flea collars and fly paper can be made from simple ingredients you might even have around the house. If you want the recipes let me know or by the book!


Monday, December 28, 2009

Preserved Lemons


A sad event happened with the frost that came a couple of weeks ago, all our new baby lemons died. Our tree was chuck full of them and I had plans for fresh squeezed lemonade, lemoncello and preserved lemons. These plans are all gone now however, and I will have to survive on store bought (aka not free and not organic) lemons. I will be on the look out for old Christmas lights however, because I have since learned that if you run a string of those through your tree and turn them on when there is a chance of frost, the heat might save your citrus.

I had also been planning a post for a while now explaining how to make preserved lemons. Although I won't be making myself any home grown ones for a while, I did give several people preserved lemons for Christmas so I will go ahead and explain how I made them and how to use them.

Preserved Lemons

1 medium sized glass jar with a tight fitting lid (don't use metallic lids unless the underside is coated with plastic)
8 lemons( or however many it takes to fill your jar)
4 coriander seeds
1 bay leaf
1 Cinnamon stick
lots of coarse sea salt

1) Scrub all your lemons really well and pat dry. You'll be eating the skin only so you want them very clean.

2) Cut off the hard ends of the lemon. Make a large cut in the lemon by slicing lengthwise, leaving about a quarter of an inch on both ends uncut, then make a similar cut in the middle of the lemon along the width, so you've cut an x into the lemon.

3) Give the lemon a gentle squeeze over your jar to get rid of excess juice and make stuffing the lemon easier.

4) Stuff each lemon with about 1 tablespoon of coarse sea salt and place in jar. After you've finished each layer of lemons in the jar, press down on the to help more juice come out. Continue to layer the lemons until the jar is full. I found the jars I used at Cost Plus for just $3.00.

5) Add the bay leaf, cinnamon stick and coriander seeds to the jar and press down one more time.
6)Once a day for the next five days you will need to open the jar and press down the lemons to get more juice out. If the lemons are not submerged after the fifth day, then juice a couple extra lemons and add the liquid to the jar.

7) Let the jar marinate in the fridge for one month and then use. It will stay good in the fridge for up to six months.


How to us Preserved Lemons

"Remove lemons from the liquid and rinse. Split in half and scrape out the pulp. Slice the lemon peels into thin strips or cut into small dices. You may wish to press the pulp through a sieve to obtain the flavorful juice, which can be used for flavoring as well, then discard the innards. "
-David Lebovitz

Preserved Lemons are used in many middle eastern and Indian dishes but can also be used to flavor basic steamed veggie dishes.
There are also many ways to season preserved lemons and recipes can be found both for making different kinds of preserved lemons, and dishes to use them in with a basic google search. Here are a few I found particularly interesting.


Saturday, December 26, 2009

50s Coffee Cake

Until I moved out of the country and into civilization, I had no idea that coffee cake did not specifically mean the flaky cherry frosted pastry that my family enjoyed every Christmas morning. The idea that this term applied to a whole host of different recipes with an innumerable range of flavors never occurred to me. I think it was actually at Starbucks in high school when I first ran into some other pastry which claimed the same name and was very confused.


I must admit, I have never tried any coffee cake other than my family's recipe and until yesterday I had never made one either. My mother however, was sick on Christmas, so I was given the sacred duty of coffee cake making. To me coffee cake is a very special dish that one only gets the chance to eat one day of the year(and considering what's in it that's a good thing for your body). This results in an overabundance of it being consumed with coffee and milk during present opening time! If you make this for your family next Christmas, be sure to schedule breaks during present opening for everyone to go and grab a second, third or fourth piece!


50s Coffee Cake
(just like grandma used to make it)

ingredients:

4 cups of flour
2 cups of melted butter
4 egg yolks
2/3 of a cup of milk
1 tsp. sugar
1 package of yeast

1 can of cherry pie filling

2 cups powdered sugar
1/2 stick of butter
capful of vanilla extract


1) Add yeast packet to 1/4 cup of warm water and set aside.

2) Mix 4 cups of flour with the melted 2 cups of butter.

3) Add the teaspoon of sugar to the milk and scald.

4) After milk has cooled slightly, beat the four egg yolks and add to the milk.

5) Mix all ingredients from step 1-4 in a large bowl and blend with hands until well combined. The dough will be rather moist.

6) Cut the dough in half and roll each piece into your desired shape between 1/2-1/4 inch thick.

7) Spread pie filing evenly over one piece of dough leaving about an inch around the edges without filling. Place the other piece of dough on top. Crimp edges to keep the filling in.

8) Let the pastry rise in a warm place for an hour. Then cut a few slits on the top and bake for 35 minutes at 350 or until the top begins to brown and looks dry.

9) While the pastry is cooling mix together 2 cups of powdered sugar with half a stick of butter, a capful of vanilla extract and enough milk to make it all come together into a nice icing.

10) Once the pastry cools, spread the icing over the top and enjoy!

Wednesday, December 23, 2009

Momma's Poached Eggs

Perhaps it is because I am feeling both overfed and I'm pretty sure a cold is about to take hold of me, but this morning I got a hunger for a couple of poached eggs. If I have made breakfast for you before, then you probably already know that I really love to season up my fried eggs with some dill or basil or if I'm feeling zesty a little chipotle pepper. This is because I generally see eggs as a carrier for some other delicious taste. There are times however, when I just really wish to enjoy the flavor of a farm fresh egg and don't wish for all the extra fluff. When I am in these moods, usually because I am ill or I have over indulged the night before, I like to enjoy a simple poached egg with salt and buttered toast.

I have read several recipes for poached eggs, and I have seen many contraptions for making them, but my favorite poached egg is still my mothers poached eggs. She has made them for me since I was a child and she has always referred to them as faux poached eggs because there is nothing fancy or technically challenging about the way they are made. Perhaps after you've over indulged this holiday season you will enjoy this simple breakfast as much as I do.

Momma's Poached Eggs

1. Fill your smallest pot with about an inch and a half of water and put on high heat.
2. Break an egg (or however many your making) and put it directly into the water and cover with lid.
3. This is the fun part. You will know when the egg is done because the pot will boil over. Don't worry, it's only water so it's not as messy as it sounds. I like my white especially well done so at this point I take the lid off and leave the egg in the hot water for another minute.
4. Remove with a slotted spoon and add a pinch of salt. Do not add any other seasonings. The point of this dish is to enjoy the simple wonderful flavors of the salt and egg.

Serve the egg(s) with some buttered toast to sop up all the runny yoke!

Monday, December 21, 2009

New Cook Book


As much as I love a light delicate modern dish, I must say, there are few words that make me go all a twitter more than Rustic. Just the mention of that word and I am swept up in thoughts of roasted chicken with creamy garlic mashed potatoes, lamb chops cooked over an open flame and seasonal veggies covered with fresh herbs. All served with warm crusty bread of course! On the flip side, rustic can mean berry cobblers and apple galettes or rhubarb pies and blueberry pandowdies. Ok, so maybe I hadn't heard of a pandowdie before yesterday, but it has now made my list.

Last night one of my friends gave me a cookbook I have been coveting for at least a week since David Lebovitz, whose blog I love to drool over, told me I needed it. This book is Rustic Fruit Desserts by Cory Schreiber and Julie Richardson. Don't get me wrong, I love some tasty chocolate, but as a general rule I prefer fruity desserts (rustic + fruity = Mmm Mmm Good). They feel less sinful somehow, and instead of leaving me feeling heavy at the end of the meal they add a lightness that I quite enjoy. While I haven't had much time to thumb through it yet, I am already enjoying some of the books helpful hints and the fact that it's arranged by season so you can be sure your recipe is using fruit that will be in season at the time.

I think I will be trying out a few of these recipes over the next couple of days, along with my new french rolling pin (our house now has three rolling pins)! Perhaps a blackberry grunt and an apple galette and a peach cobbler and...

Wednesday, December 9, 2009

Turkey Soup


Nothing warms the bones during these cold weather snaps like a big steaming bowl of homemade soup, and luckily, nothing is more easy to make. This year I froze the turkey carcasses (I wish there was a prettier word for that) Thanksgiving night and the next week I boiled them down into a delicious stock. I just threw the birds (you can also add the necks if you save those) in my water bather, covered them with water and let it simmer on low heat for a hour and a half or so. I wanted to make a plain broth, but you could also add a bay leaf or other herbs to it while its cooking. After the broth was done I let it cool overnight. then pulled the birds out, stripped any good meat off them and poured the broth into gallon zip lock baggies to freeze. From two birds I ended up with a little over 3 liters of broth and several cups of turkey.


This last weekend Jeff and I defrosted a bag of broth and made ourselves a hearty turkey soup with the last of our garden veggies. We served the soup with some left over rolls we had frozen from Thanksgiving.

Thanksgiving Turkey Soup

2 cups of left over turkey bits torn into little pieces

1.5 liters of turkey broth

Any veggies you happen to have cut into chunks:
Carrots
Zucchini
Celery
Onion
Chard (add right before serving)

5 garlic cloves minced

3 cans of white beans


1) Defrost broth and add to a large stock pot on medium heat. Toss in garlic and beans.

2) Cut veggies into large chunks adding those that take longer to cook first.

3) If you don't have any fresh veggies (or if its just too cold to go out and pick them), add a few vigorous shakes of Italian seasoning. Otherwise, add some fresh rosemary, parsley and a bay leaf. Salt and Pepper to taste.

3) Simmer soup until the carrots are soft but not mushy, 20-30 minutes. Add meat in the last five minutes just to heat it up.

4) Pour into bowls with torn up chard in the bottom. You can grate some cheese over the top if you have any on hand (we used Gouda).

I know this recipe isn't rocket science, but soup is a great way to use up some veggies from the crisper drawer that you might not know what to do with. The whole meal also only takes about 30 minutes to make, so it's a perfect weekday meal that is big enough for leftovers.

feel free to exchange the beans for any starch you might have on hand (potatoes/rice/pasta).


Friday, December 4, 2009

Cranberry Sauce


I know its been a while, but this time of year I have trouble staying focused on gardening issues. Actually, this is the dreaded time of year when I often forget that I have a garden and I step out in the backyard a month later to find everything dead!

I have however, been cooking. Jeff and I hosted Thanksgiving this year, and since many Thanksgiving recipes also find there way to the Christmas table, I thought I'd share my simple cranberry sauce recipe with you. The ginger gives it some unexpected spice while the orange complements the cranberries and adds another dimension to the sauce. I tamper with the amounts every time I make it depending on my mood, but here is the basic recipe to start with.


Orange-Ginger Cranberry Sauce

1 bag of cranberries

1 cup white sugar

1/3 cup brown sugar


2 tsp grated fresh ginger

2 tbsp orange zest


1) Bring 1 cup of water and the white sugar to a boil, add cranberries and reduce heat to keep it from bubbling over.

2) Add brown sugar, ginger and orange zest and cook for about ten minutes. You will know the cranberries are getting done when they have popped/split. Stir it regularly during this time and don't be too worried about over cooking it.

*tips:

If you don't have fresh oranges, you can also use a splash or two or Grand Marnier or the like.

You can also make this recipe a day in advance which gives the flavors time to blend together nicely.

Wednesday, November 18, 2009

Trying Out Turnips

Several things have caused me to become more interested in turnips. First I have generally become more interested in root crops since I planted my first batch of carrots a couple months ago. Once they get going you just keep them watered and they magically turn into delicious food hidden beneath the earth. Second, I am always interested in expanding the variety of things I grow. Third and last, in the last Harry Potter book I read they ate mashed turnips, which lead me to believe that they can't be that different than a potato and strengthened my resolve to grow them.


My boyfriend, who is a bit more practical than me sometimes, recommended I buy some turnips and try cooking them before I fill the yard with them. This of course lead to a recipe search and when I saw the recipe I am about to share with you I fell in love. How can anything smothered in a creamy garlic and Gouda sauce be bad? It can't. I served this recipe with the roast chicken I posted about a couple of days ago and it was wonderful. I'm sure it would also make a great companion to your Thanksgiving turkey!


Potato & Turnip Au Gratin with Leeks


1 lb russet potatoes, peeled and thinly sliced
1 lb turnips, peeled and thinly sliced
3 leeks, white section only, thoroughly washed, thinly sliced
1 cup whole milk
1 1/4 cup heavy cream
2 cup shredded Gouda
3 large cloves garlic, minced
2 TBSP butter

Salt & pepper to taste


1) Preheat oven to 365 degrees. In saucepan combine milk, cream, garlic and salt and pepper. Do not boil. Reduce heat and simmer for another 5 minutes, then set aside. Don't be shy on the salt, it will help flavor the potatoes and turnips.


2) In a large pan melt 1 T. of the butter and add leeks. Cook for 7-8 minutes until leeks start to brown, stirring frequently, then set aside.


3) Spread remaining butter around a 9x12 baking dish, covering all sides. Assemble potatoes and turnips in dish alternating each vegetable. Season each layer with salt and pepper.


4) Add 1 cup of gruyere and cooked leeks on top of first turnip and potato layer.Pour cream mixture over the top just barely covering. Layer remaining vegetables seasoning with salt and pepper. Top last layer with remaining cheese and cover with cream mixture.


4) Bake for 40-45 minutes until top is golden brown and potatoes can be pierced easily with a sharp knife. If you're worried about burning you can cover with foil and leave it covered until about 10 minutes before it's done. I would also recommend placeing the dish on a cookie sheet in the oven incase it boils over a bit.


This is a VERY rich dish so a little goes a long way. This recipe serves +/- 9 adults. For a normal family size I would cut it down to an 8x8 dish unless you like lots of leftovers. Mmmm, on second though, stick with the big dish! So delicious.

Year Round Salads

Hey everybody, my mother has graciously written another post for you. Enjoy!


Having grown up in the Midwest, I learned that after cleaning up the garden after the first frost (late September, early October), nothing else was done until Spring unless you were lucky enough to have a full fledged, heated greenhouse. But Sacramento is a different story; gardening can be a year around pursuit. Even without a greenhouse of some sort, veggies can be grown for 9 to 10 months of the year. However, with some sort of shelter, gardening can be a 12 month undertaking.

I found these little popup greenhouses at Emigh Hardware several years ago that are 4 foot x 4 foot and fit perfectly over my raised beds. They have lots of zippers to allow access and ventilation and fold up into a very small round carrying case. It is a bit of a trick figuring out how to fold them but I always seem to be able to get it done. When you take them out, you just throw them onto the ground and they spring up into a neat little greenhouse. They have grommets around the edges so I put some eyescrews near the bottom of my raised beds and either tie or bungie cord the greenhouses to the eyescrews to keep them from blowing away in a winter storm.

Of course, you can’t grown summer crops in them like tomatoes or peppers without supplemental heat, but they are great for onions, radishes, lettace, spinach and other cool weather crops. It means that with very little work you can enjoy fresh salads year around.

I put these up 3 weeks ago and have green onions almost ready to eat. For some reason this year my first planting of lettace and spinach did not sprout but I replanted them and the new ones are sprouting. My seeds were a bit old the first time but I used new ones the second. Sometimes old seeds will sprout with no problem, sometimes they don’t.

These little greenhouses also make great Spring hot houses for starting seeds when the evening temps are still too cold for most seeds to sprout.

My next project will be in January when I am going to try to build a 3 foot x 4 foot raised bed with a greenhouse top made from 2 x 2 lumber and clear vinyl from the fabric store that can fold flat for summer storage. If it works, I will post the design….if it doesn’t you will never, never hear another word about it.

I wish you all happy gardening, successful preserving, creative cooking and delicious eating.

Monday, November 16, 2009

My Little Friend

This weekend I tried a new contraption for roasting chicken and let me tell you, I'm in love. This beauty only cost $3.99 and it made the most beautiful golden brown chicken I've ever made (though the upright cooking position looks a little freaky to me). The skin was so crunchy it started to crack as I pulled the bird off of the stand. I recommend everyone go and buy one of these immediately.

In addition to making a beautiful bird, they also leave enough room in your oven to cook a side dish.

To season my bird I finely chopped about a tablespoon of Rosemary, half a tablespoon of sage and five garlic cloves and rubbed this mix under the skin. I didn't add any olive oil. I then sprinkled a generous amount of salt on top and popped it in the over for an hour and a half and 450 degrees (cooking time for a six pound bird).


I never basted it and it turned out crispy and juicy. I then used the juices that collected in the bottom of the stand to make a tasty gravy. Mmmmmmm...

Monday, November 9, 2009

Seed Sharing

I know it might seem a bit early, but I know at least Theresa is already talking of seed catalogues and ordering so I thought I'd bring up seedling swapping now. Also, I haven't posted in while and my research paper draft is now finished so I have a spare moment and desperately desire to post!

My idea for this spring is that those of us who have gardens, big or small, and those who might be inspired to start one, could participate in a seedling swap. I for one, do not get supper excited about growing my own seedlings, but I am resigning myself to the fact that it is much cheaper to grow them from scratch then to buy them from the store. I must learn to do without, or at least less, of the pure joy I get from walking the aisles of the Longs in Oakland, discovering new things I haven't tried, admiring flowers, sniffing leaves and letting them run between my fingers as I pass by. I must learn to be more responsible with how I spend my money on this gardening obsession of mine! One way to make the tedious act of seed starting more fun would be to make it a group effort.

The way the swap will work is if you have something that you have very good luck at growing from seeds then don't just start enough for you, but start a whole slew of them. Then, anyone who wishes to participate can bring their seedlings to a centralized location , I'm assuming my mothers, on a date to be set this spring and we can all trade seedlings. Mmmm, perhaps there could even be snacks and a punch involved!

Of course this could turn out to be chaos without a little organization, so I thought this post would be a place to start where people could say what they intend to grow extra of in the comments section. If things change, or you wish to add a new plant to your list, then you can just edit your comment later on. Also, if you see something someone has posted that you definitely want, you can comment on that too so they have an idea of who is interested.

Wednesday, October 28, 2009

Chicken Wings


Allow me to introduce you to our chicken coop. Sure it may not have a living roof (yet), but at least it no longer has "chicas" spray painted across the door. It has also been expanded now so the fenced in area which never quite made sense serves a purpose. It gives the girls a little place to scratch and peck to their little hearts content. This means no more poop all over the patio, chickens flying onto the table during meals or tomatoes getting ripped to pieces by ravenous chickens!


On a side note. Did you know that chickens are attracted to the color red? This seems like a interesting quirk until they are eating your beautiful ripe tomatoes or chase you around the yard trying to peck your freshly painted toes!


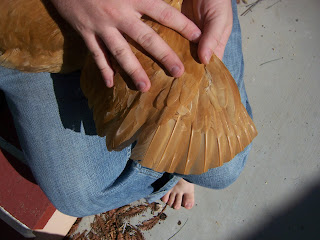
Once the girls were granted access to their new run, it quickly became apparent that a 3 foot fence was not tall enough to keep them inside. Jeff finally decided that he needed to clip some wings to keep the ladies in. He clipped Stinky first. She is the alpha of the group, and he clipped the one set of flight feathers right before his lunch break ended (this might seem obvious, but just in case, only clip one wing. If you clip both they will still be able to fly). He went back inside figuring he'd do the rest after work, but to his surprise, no chickens left the pen for the rest of the day. Apparently, without stinky to lead the way, the other chickens were perfectly content to stay inside their pen. So if you ever find yourself with lots of chickens but little time, just clip the alpha and your task is done!
unclipped clipped

Tying Up The Loose Ends

Its that bittersweet time of year my friends when the last of the summer garden is still trying to produce one last fruit. I have a hard time pulling up my tomato bushes. I want to wait until they are 100% dead, but that means I wait a long time for them to stop giving me one tomato here and there. Truly, I am hoping that yesterdays windstorm knocked a few of them down so I'll know that I have to pull them up.


My mom, however, does not feel this same guilt at tearing her still green tomato plants out of the soil in preparation for winter. All of her plants are already in the green waste bin and her last bit a food preservation finished for the winter. Enjoy her guest post.
THE LAST OF THE TOMATOES

For the last month my tomato production has been slowing drastically. No longer was I picking enough to can in one day. So as to not waste the ones that were more than I would eat fresh, every week I would take those that were fully ripe, peel them and cut them up over a strainer. The juice that came off was very thin but delicious and I put that in the refrigerator to drink fresh. The rest I put in baggies and froze. Today I pulled up the rest of my tomato plants so the frozen pieces that I had been saving for the last month were ready to can. I thawed them out, ran them through the juicer with some carrots, onions and garlic, boiled up the concoction and canned it. It is the consistency of V8 juice but has no salt or things I can’t pronounce in it. Ad a dash of hot sauce and it makes the most delicious Bloody Marys. I ended up with 11 pints canned and a quart in the refrigerator to use in the next few days. Thus ends my 2009 tomato canning. I now have stewed tomatoes for winter chili, homemade tomato soup to go with the toasted cheese sandwiches, salsa for my tacos and juice for my bloody marys. It’s going to be a good winter.

Friday, October 23, 2009

Pretty Pansys


My mom bought these Copperfield Pansies from a nursery up in the Marysville/Yuba City are and I can't stop staring at them. I've never seen pansies in autumn colors before. I desperately want a pot chuck full of these beauties right next to my door with the pumpkins.


Saturday, October 17, 2009

Lazy Saturday Morning....Afternoon

OK, so maybe I didn't wake up until the morning was almost over. Apparently I do not have the farmer's ability to wake up at the crack of dawn on a Saturday, but I can live with that. When I did finally wake up this morning, I headed straight for the yard to pick some roses.

Perhaps its the result of the rain storm we just had, but Jeff's roses seemed to be doing one last hurrah for the season this weekend. I picked enough roses to make four bouquets of different sizes. I remember when Jeff bought this house, I had dastardly plans to get rid of most of the roses. They were suffering from a severe case of neglect and made his house look even more old ladyish. I have came to feel differently about the roses however, when I realized that they are some of the most fragrant roses I've ever met. I don't know what kind they are, but I'm assuming they are some old varieties become they smell like they had been sprayed with pure rose oil right before you sniff them. In a world that is full of scentless roses, this yard, with its eight amazing rose bushes is a real treat.


I did find a little hitchhiker though as i was distributing the bouquets around the house. This little baby snail was so cute and small that I went against my inner gardener and let it be, even though Jeffry's front yard has a major snail infestation. Did you know, that the snails in California are the same kind the French eat? I'm intrigued by the idea of free protein wandering around by the handful right outside the door. I wonder....


After flower picking and snail pondering had finished. I picked some fresh bell pepper for the pico de gallo Jeffry was making to go with our quesadillas. The food processor made it quick work as he just threw the tomatoes, onion, bell pepper and chile in, whirled it a few times and poof! Fresh pico de gallo magically appeared.


To finish off, I discovered a while back that the fruit from my pineapple guava was not lost, but still on the tree, just camouflaged. They finally ripened so I picked one and Jeffry and I gave it a try. They were not what I expected. They taste nothing like pineapple. I think they taste like a cross between a pear and a kiwi, and Jeffry thinks they taste like a cross between a pear and grape. I think the lesson we learned is that they don't taste very comparable to other fruits and are a flavor all their own. I'm going to wait another week and then pick another one to see if the taste changes. The flesh seems like it should have been a bit softer. We agreed that these little guys would make great jam, pie (perhaps mixed with strawberry) or a unique addition to fruit salad. Pineapple guavas are pretty productive once they mature, so I'm looking forward to making all these things in the future.


Wednesday, October 14, 2009

The Answer My Friend....


For anyone who somehow managed to miss the weather yesterday, I took this picture at school. I think it pretty much sums it up. I was not foolish enough to attempt to carry an umbrella, but many people at my school were, and thus most of the trash cans I passed walking back to my car looked like this one.


Although my umbrella was safely stowed in the back of my car, my garden was not so Lucky. Natomas is generally windy anyways, but yesterday was like a scene from the Wizard of Oz. I guess it was a good thing I ripped up a few of my tomato plants on Sunday. It was easier than coming through and trying to clean up the destruction.

Here is a bit of a rundown of my casualties. My borage, which was happy and healthy on Monday, has started turning a sickly shade of brown and slumped over the side of it's pot. Perhaps a Syrian native isn't going to like the cold wet winter. The wind knocked over my corn, but at least that was a failed experiment anyways. It also knocked over the jewel of my garden, a giant pear tomato plant that was at least seven feet wide and five feet high. It was so big I had to tie its branches to my fence to keep them from taking over the rest of the garden. I'd been putting off taking a picture of its gloriousness, and now alas, it is too late. A large portion of the top half of the plant was ripped off the fence by the wind and now lies in a tangled mess. The wind also attempted to blow over my Roma which, while pretty shaken up, stood it's ground. Perhaps it helped that the yellow pear tomato fell on top of it and held it more or less in place! You can't see much of it in this picture, but my peter pan squash also looks a bit miffed at being so abused yesterday.


The only plants that seem happy by this turn of events are my greens. My more mature kale, spinach and chard seemed tickled to death that they got to bath in cold water all day. Even the brand new seedlings I'd just planted on Sunday seemed to come through the whole thing unscathed. I guess now I really have to tear the last bit of summer out of my garden, and commit to my winter crop.

Tuesday, October 13, 2009

Project Cider


Hello friends, there is a comic whom I don't particularly like, but he did tell a joke once that I found particularly inspiring and it went something like this:


If life gives you lemons, then find someone who life has given vodka, and have a party!

Well life hasn't given me lemons, but it did give me apples and thanks to the Internet and my local brew store it also gave me (allowed me to purchase) brew supplies and instructions. With these things in hand Project Cider went underway and my family and I now have five gallons of apple cider hopefully fermenting in my old bedroom!

We basically followed the directions from Mother Earth News for making hard cider. The only thing we changed was using potassium metabisulfite for sterilizing the bucket and to kill the wild yeast. This means we never cooked out cider or used bleach.

Here is what we've done so far:


1.) Wash, core and juice +/- 120 lbs. of assorted apples (the picture shows maybe a 1/3 of the apples used). We used primarily Granny Smith, Golden Delicious and Mutsu's, but we also threw in a few Rome Beauties just for fun. The goal is to get 5 gallons of juice.


2.) Sterilize a brewing bucket with potassium metabisulfite diluted in water.

3.) Add juice and 5/8 tsp. metabisulfite to bucket and allow to sit for 24 hours.

4.) Add 10 cups of brown sugar and yeast to the mixture and cover till the airlock stops bubbling, should take about two weeks.


Monday, October 12, 2009

Pitcher Plant

About a year ago, i saw the most beautiful giant red pitcher plants at Trade Joe's. There were striking and intense and looking back on it, only $8. Unfortunately, I was feeling particularly cheap or poor that day and I passed. I though to myself, "maybe next time." But there never was a next time. The next time I went into Trader Joe's there were gone, never to be seen again.


Yesterday when I went to Trader Joe's I saw that they once again were carrying pitcher plants. Perhaps they are not veined with as much scarlet as the ones I saw last year, and perhaps they are not as big, though they are the same price :-( , but alas I could not make the same mistake twice. So I bought myself the pitcher plant and painfully passed on the wonderfully eery corkscrew grass (maybe next time). So now my desk has a lovely decoration which I think is fitting for the Halloween season.


Carnivorous plants need a lot of water since they are generally found in boggy locales. To give my plant that boggy place to call home I am using a self watering pot. As you can see in the picture, three is a circular pot which rests inside of the square one. The circular pot is very porous so it allows the water which fills the square pot to seep into it. I'm hoping this will keep my carnivorous new friend nice and happy!


Friday, October 9, 2009

Fall Color

I stumbled upon a California native this week that is the cure for those who misses the brilliant fall colors of back east. Its called Roger's Red and it's a grape vine! This little vine will grow three to six feet each year, produce seedy grapes for the birds to eat, and best of all it turns a brilliant red in the fall. I haven't see one in person yet but I'm already thinking of places I could put one of these beauties as soon as I find it! Click here to learn more about this plant.

Monday, October 5, 2009

Pumpkin Scones


Hello friends, I hope you all got out to enjoy the nice fall weather this weekend. My sister sent me a recipe in keeping with my fall theme that I had to try out now that the weather is perfect for heating up the oven. Although these pumpkin scones didn't turn out as pumpkiny as I expected, they were super moist and made the house smell wonderful! I was feeling particularly domestic so I used a pie pumpkin for this recipe, but you could substitute if for canned if you like. So pour yourself a hot glass of apple cider and enjoy this fall treat!
Pumpkin Scones

Ingredients:
About 2 1/2 cups all-purpose flour
1/4 cup firmly packed brown sugar
1 tablespoon baking powder
3/4 teaspoon ground cinnamon
1/2 teaspoon salt
About 1/2 cup (1/4 lb.) butter cut into chunks
3/4 cup pumpkin
1/2 cup plus 1 tablespoon milk
1 large egg yolk
1 tablespoon granulated sugar
Preparation:
1. Cut pumpkin in half, remove seeds and place cut side down on a cookie sheet with a thin layer of water in it. Bake at 350 degrees until a fork inserted through the skin slides through the pumpkin (about 1 hour).
2. In a bowl, mix flour, brown sugar, baking powder, 1/2 teaspoon cinnamon, and salt. Add 1/2 cup butter and, with a pastry blender or your fingers, cut or rub in until pea-size crumbs form.
3. In a small bowl, whisk pumpkin and 1/2 cup milk until well blended. Add to flour mixture and stir just until dough is evenly moistened.
4. Scrape onto a lightly floured board, turn over to coat, and gently knead just until dough comes together, 5 or 6 turns. Pat dough into a 6-inch round 1 1/2 inches thick; cut into 6 equal wedges.
5. Separate wedges and place on a lightly buttered 12- by 15-inch baking sheet. In a small bowl, beat egg yolk and 1 tablespoon milk to blend; brush lightly over tops of scones (discard any remaining egg wash). In another small bowl, mix granulated sugar and remaining 1/4 teaspoon cinnamon; sprinkle evenly over scones.
6. Bake in a 375° regular or convection oven until scones are golden brown, 30-35 minutes. Transfer to a rack; serve warm or cool.

Wednesday, September 30, 2009

Must Haves

Hello friends, the other night I threw together a rather tasty black bean soup for dinner, and it got me thinking about a few of the essentials that everyone should always have in their fridge/cupboards. Especially for people who are living alone or in pairs. My official list of must haves are:

Tomatoes
Mushrooms
Garlic (fresh or powder)
Onion
Carrots (optional in summertime)

A can of Black Beans
A can of chicken stock

Your Favorite Rice
Your Favorite Pasta

It is my belief that if you keep these basic ingredients on hand at all times you will always be able to feed yourself well. You could throw together a pasta dish, dirty rice or soup in no time. If you keep a decent selection of dried herbs on hand, you can also do anything from Italian to Mexican to a good old fashion stew. The bonus is that you can also grow many of the fresh ingredients easily in your backyard or patio. If you really want to get adventuresome, you could even try your hand at mushroom growing (really wanna try this)!

Weeknight BB Soup
(serves two)

5 small Roma tomatoes
5 cloves of garlic roughly chopped
handful of rough chopped onion
handful of sliced carrot
1 small jalapeno (optional if you are heat sensitive)
1 can of black beans
1 quart of chicken broth
Salt, Pepper and lots of Cumin to taste

The wonderful part of this soup is all you do is chop everything up, throw it in the pot with grace and style and let it simmer until the carrots are soft (about 20-30 minutest). I served it with a thick slice of buttered bread. The tomatoes can cause a slight film/bubbles to develop on top so you can either just scoop that off or wait until the last five minutes to add the tomatoes.

Tuesday, September 29, 2009

Fall Films


Its here....

If you don't know what I mean when I say this, then you haven't opened your windows this morning. Fall has come. As I sit here bundled up in my furry slippers sipping my second cup of hot coffee, I can't help but think about how nice it would be to curl up with a blanket and one of my favorite fall movies. It's the perfect time for movie watching. The garden is winding down to things that need less care such as greens and root crops, nature will soon take over watering duties and it is finally cool enough to pull out those fleece blankets you got for Christmas last year.

In honor of this wonderful turn in the weather, I'm compiling a list of my favorite fall films so that I don't miss any this year. There is only about a month to watch Halloween related movies and two months for fall movies in general. After that Christmas movies take over and well, that leaves little time for anything else. So I shall start my list here and feel free to add any of your favorites in the comments.


Practical Magic (this one gets multiple viewings in October. Midnight Margaritas!)

The Witches of Eastwick

Coraline

Hocus Pocus

Chocolat

The Scarlet Letter

The Adaams Family

The Harry Potter Series

Betelguise

Dracula

The Charlie Brown Halloween & Thanksgiving Specials (I actually hate all the peanuts specials, but lots of people love it so what the heck.)

I loved all your guys' recommendations so much I've added them to the list! I'll keep updating as more come in.

Monday, September 28, 2009

Peach Cobbler

So it has been a bit harder than I expected to continue posting now that I am back in school again. Not only do I find it hard to make the time to post, but its even harder to find the time to do the things which inspire these posts such as gardening and cooking. On top of all of that, it's been too damn hot to enter the kitchen for the last several weeks! I am hopeful however, that the weather is soon to change and the baking bug will once again return. In anticipation of that, I have a peach cobbler recipe for you all that is to die for. I know lots of people are attached to crumbly topped cobblers, but give this biscuit topped recipe a try. You won't be sorry. Oh and no picture for this one folks (note the too damn hot comment above), but you can see some on the blog I stole this recipe from.

Kristen’s Peach Cobbler

You’ll need:
6 cups peeled and cored peaches
1/2 cup sugar5
tablespoons unbleached flour
——
1 3/4 cups unbleached flour
6 tablespoons sugar
1 1/2 teaspoons baking powder
1/2 tsp salt
6 tablespoons butter or non-dairy butter-cold
1/2 cup milk or dairy-free milk
——-
2 tablespoons butter or non-dairy butter
2 tablespoons sugar
1/2 teaspoon cardamon

Instructions:
Pre-heat the oven to 375 degrees. Peel and core the peaches and put them into a cast iron frying pan(I just used a regular glass baking dish). Mix in the 1/2 cup sugar and 5 Tbsp flour. Set aside.
——
Mix together the flour, sugar, baking powder, salt. Add the cold butter and milk and stir until mixed. Spoon the biscuit mixture over the peaches.
——
Brush the melted butter over the cobbler. Mix the sugar and cardamon together and sprinkle on top of the cobbler. Put into the oven and bake until the top browns, about 45-50 minutes. Cool for about 20 minutes and serve with fresh whipping cream or ice cream.

Friday, September 25, 2009

Harvest Muffins

Hey everybody, we have another guest post! This one is from my sister Theresa up in the foothills. Hope you enjoy her ode to fall and tasty sounding recipe!


Fall is my absolute favorite time of year. In fact, when FOX was a fledgling network they had a short lived science fiction show whose name escapes me, but on one episode one of the characters (a female Space Marine) was waxing eloquent about why she missed autumn on Earth….she said, “There is something so desperate and sexy about autumn….” I have always found that to be a perfectly fitting description. Desperate because it’s the last push to get the harvest in and the household/farmstead/den battened down and sexy because it’s when the vast majority of animals mate in order to ensure a spring birth….lots of action, activity and pheromones in the air! I myself have very fond memories of helping my father’s family with the fall harvest on their farm in Iowa . As a small child I couldn’t help much, but help I did and it was the one time of year that whole side of the family came together to work as a clan. Crisp mornings, sweatshirts, my dad’s big coyote-fur lined winter jacket that I would get to wear once he worked up a sweat, leather work gloves, the crunch and smell of dried corn, the pulsing sound of the combine, the ubiquitous snarl of a chainsaw that we and others were constantly running to try to beat the snow with firewood preparations, and the occasional crack of a hunter’s rifle echoing off the land are all indelibly burned into my brain….desperate and sexy indeed.

As such I am a sucker for anything “harvest” whether a theme (how about a harvest wedding…sans chainsaws, of course!), decoration, movie or recipe. I received a recipe recently called “Harvest Muffins” from one of my Yahoo user groups. The ingredients sounded like a slam dunk, but the first batch left a lot to be desired….they made the house smell wonderful, however the spices called for were just enough for aromatics and not taste. In addition, the cook temps and times called for resulted in a very dry muffin that resulted in the last two remaining being thrown out. Plus the quantity of raisins called for completely overwhelmed the recipe.

I did a second batch and the only thing that resembles the original is the ingredients list. All spices and the raisins have been significantly adjusted and the baking temperature reduced while the time was increased. This resulted in a muffin that not only smells GREAT while baking, but tastes wonderful and remains very moist inside. Bear in mind that even once the toothpick comes out clean these muffins retain a lot of moisture around the apple shreds and may appear underdone if you eat one right after baking. Give them some time to sit and the moisture disperses evenly through the whole muffin. I store them in a plastic tub with a light dishtowel draped on top to keep them moist but prevent molding. Also keep in mind that these are more like a zucchini or banana bread than a true muffin and as such don’t rise terribly high.

I hope you relish them as much as I do—they are utterly perfect for a desperate, sexy fall morning (or even a mundane, frumpy one!). Serve with hot coffee or plain black tea and enjoy!!

2 c all purpose flour
1/3 c sugar
1 TBS baking powder
1 ½ tsp cinnamon
¼ tsp baking soda
½ tsp ground allspice
½ tsp ground nutmeg

1 c apple juice/cider
1/3 c vegetable oil
¼ real maple syrup
1 large egg beaten
2 tsp vanilla

1 granny smith apple, peeled, cored and shredded
3 oz chopped walnuts (1/2 of a big package)
½ c golden raisins

Blend dry ingredients in one bowl. Blend wet ingredients in another bowl. Combine the two until just mixed and fold in the last three ingredients.
Divide batter into muffin pan (the cups will be pretty full)

Bake at 375 degrees for 30-35 minutes until a toothpick comes out clean. The apple should still be really moist inside.

Saturday, September 19, 2009

Julie & Julia


If you enjoy food and the warm feeling of love filling your heart, then the movie Julie & Julia is for you. Its a wonderfully crafted hilarious story, and while it's not as full of completed dishes as one would expect, it is full of yummy looking food preparation. I was inspired by one of the meals that Julie makes, and if you ask anyone whose seen the film, they remember it too.


It's a simple meal of pan fried bread topped with lots of fresh chopped tomatoes and herbs. The best part was hearing the crunch as Julie and her husband ripped into this dish animal style. I was feeling a bit carnivorous when I tried to make it, so I added some Italian sausage. Hope you enjoy my interpretation. Oh and a little warning, this recipe is very bad for you!

Open Faced Italian Tomato Sandwiches
(Serves Two)

Ingredients:

Italian Sausage
2 Thick Sliced Sourdough bread
Butter
2 Roma Tomatoes
2 Small Yellow Tomatoes (Golden Jubilee)
2 Tbsp. Chopped Yellow Onion
3 Tbsp. Fresh Chopped Parsley
2 Tbsp. Ribbon Cut Basil
1 Tbsp. Fresh Thyme
2 Garlic Cloves minced

2 Tbsp. Olive Oil
1 Tbsp. Balsamic Vinaigrette
Tiny Dollop of honey
Salt and Pepper

Instructions:

1)Mix sausage and thyme and cook the sausage through. While the sausage is cooking, chop the tomatoes and all the herbs. Once the sausage is done, drain it on paper towels.

2) Mix together the olive oil, balsamic vinaigrette & honey. Toss in tomatoes and onions and mix well. Season with salt and pepper to taste.

3) Cover both sides of bread with butter. Press the chopped parsley and garlic onto one side of the bread. If you plan ahead, you can also mix the butter, parsley and garlic together then spread that on the butter.

4) Fry both sides of bread in a pan until golden brown. Immediately layer with sausage then tomato mixture. Sprinkle on top with basil.


You'll want to eat this IMMEDIATELY! Within five minutes it will be soggy so have the table set and the beers pours before you put it together. It would go great with a glass of cold Hef or a Pale Ale.

So go see Julie & Julia. Then come home and make this tasty late summer meal.

Wednesday, September 16, 2009

Cleaning Solution


I know I've already posted once today, but I've been holding onto this post for the past couple of weeks, and now is finally the moment. Ok, now is actually the time for homework, but trivial things like that can wait.


You see, I live with four other people, three of whom are now mechanics. In addition to this, our newest roomy brought with him a giant TV and gaming systems for the living room. This means our common areas have unfortunately started to smell like a mix of engine grease, man sweat and cigarettes. Disgusting. Our carpet has also received some unfortunate stain marks from the bottom of their greasy boots. On top of all of this, I began school three weeks ago and now lack the extra time to keep on top of their messes.


Alas, this situation has lead me to think about cleaning solutions and I have a recipe to share with you for an all purpose cleaner today. While I know that vinegar and water (which I use for my windows and mirrors) works great, I hate the smell of it. This recipe may cost a bit more upfront, but the ingredients will last a long time and it doesn't smell bad. In fact, you can make it smell however you like! Another thing I liked about this spray, is that it doesn't leave any sort of residue like the Trader Joes all purpose cleaner does.


-1 empty 32 oz. spray bottle
-3/4 c. Distilled White Vinegar
-1 c. Hydrogen Peroxide
-1 1/2 tsp. Castille Soap (Such as Dr. Bronner )
-30 drops Tea Tree Oil
-30 drops Essential Oil of choice (some of my favorite choices include lavender, lemongrass, rosemary, lemon verbena, spearmint, clove, cinnamon, anise, sage, grapefruit, lemon, and lime; experiment with one or a combo and see what scent makes you want to get lean and clean!)

The Deal:
-Place all ingredients into the spray bottle using a funnel or measuring cup with a spout.
-Add water until contents reach top of bottle.
-Shake vigorously and use with abandon!


*This recipe is found on the blog design*sponge

Breads

At the harvest dinner, we ended up with lots of carbs, particularly in the form of bread. I wish I had gotten a picture of Matthew's focaccia bread to share, he inserted basil leaves into the top of the bread so that they almost looked like little flowers coming out of it. It was awesome. Jeff and my breads were not quite so cool, but they are what I have a recipe for so that is what I will share with you now.

Jeff made three baguettes for the evening to go with the brushetta I had made the day before. In our first attempt to make this bread, we learned the very important lesson (or relearned in my case) that you shouldn't bake bread on dark cookie sheets. The bottoms WILL burn. Our first go at this bread was a horrible failure. They all burned, and although Jeff tried to save my terrible bread by lovingly scraping off the black part and saying it wasn't that bad, I knew the truth. I was particularly disheartened because the bread rises for four and a half hours, so it's not like we could just mix up another batch at 10 pm.

The next day Jeff gave it a second try and his attempt turned out far better than my first. Here is the recipe we used, slightly modified from it's original source.

French Baguette a la Jeffry

ingredients:

4 cups Flour
1 tbsp. Dry Active Yeast
1-2 tsp. Salt
1 3/4 cups Warm Water
1-2 Tbsp. sugar
Oil for bowl

How to make it:

1. In a bowl, mix together the flour and the salt.

2. In another bowl, combine yeast, warm water, sugar and half of the flour/salt mixture. Using your hands, mix until it forms a dough. Then, cover with a dish cloth and let sit at room temperature for 3 hours. It should triple in size.

3. Gently incorporate the rest of the flour/salt, using your hands.

4. Place on a lightly floured surface and knead for about 10 minutes. It should be supple and elastic when you stop kneading.

5. Lightly oil a bowl. Place dough in bowl. Cover with a dish towel. Let sit for 1 hour. It should double in size.

6. Preheat oven to 450°F. Knead again. Then cut dough into 3 parts and form each part into a long baguette. Place on a baking sheet. Let sit for at least 20 minutes.

7. Place a bowl of water in the oven. Bake baguettes for about 25 minutes (maybe less, check often towards the end). Remove the bowl of water after 15 minutes of baking and spritz the baguettes.

The other bread we made went off without a hitch. It was an herby pull apart bread which utilized lots of fresh herbs from the garden. The original recipe can be found here.

Herby Pull Apart Bread

Ingredients:
6 cups all-purpose flour
2 tablespoons sugar
2 teaspoons salt
2½ tablespoons active dry yeast
2½ cups warm (120 to 130F) water
1 tablespoon finely chopped flat-leaf parsley
1 Tbsp. each finely chopped sage, rosemary and thyme
1 tablespoon melted butter

How to make it:
1. Grease two 9-x-5-inch loaf pans.

2. Combine 4 cups flour, sugar, salt, yeast, and 2½ cups warm water in a large bowl. Add herbs and stir until well blended. Stir in remaining flour until smooth. Cover and let rise until doubled in size, about 45 minutes.

3.Stir dough for 25 strokes.

4.Separate dough into 16 balls of equal size. Place 8 balls in each loaf pan in two rows. Cover and let rise until doubled in size, about 30 to 45 minutes.

5. Bake loaves 30 minutes at 375F. Reduce heat to 350F and bake 15 minutes longer, or until bread sounds hollow when tapped on the bottom. Cover loosely with foil during the last 10 minutes of baking time to prevent over-browning.

6.Remove from pans immediately and brush with melted butter. Cool on a wire rack.

The balls will pull apart to dinner roll sized portions. I served it with butter that had just a bit of honey in it. The sweetness really complimented the herbs.


Monday, September 14, 2009

Good Food and Good People


Yesterday Jeff and I hosted our first harvest dinner with the bounty found in our yards. We quickly discovered that its an interesting challenge to try to make different tasting dishes for 9 people out of a limited number of ingredients, but we enjoyed it and learned a lot about what worked and what didn't. In this post I'd like to share with all of you the triumphs (failures and lessons learned will come later).


But first, here was our menu (things I used a straight recipe for are linked to)


Lemon verbena tea
lemoncello

savory herb bread
Zuchini soup
Fried squash blossoms
deviled eggs
chips and homemade peach salsa

fritatta
Mashed purple potatoes with herb butter
Brushetta on baguette
local melon

applesauce


Apple Galette with vanilla ice cream


Triumphs:


There were three items in last nights dinner that really surprised me with how wonderful they turned out. The first, was iced lemon verbena tea. Honestly, I thought it might end up tasting like wood polish, but it ended up being a delightfully refreshing beverage which would be perfect to have in the fridge for after a long day out in the garden. Oh, and it's simple to boot!


Lemon Verbena Iced Tea


1) Boil water ( 1 cup of water for every 5 leaves).


2) Remove from heat, add torn up leaves and let steep covered for 20 minutes.


3) Strain tea into a pitcher and add honey to taste. Do not add ice until you pour the tea into your cup or it will water down the flavor of this delicate tea.


The second unexpected bit of deliciousness was the zucchini soup. Not that I expected this soup to be awful, but I didn't expect too much from it. It was something I had made once before when Jeff and I had an overabundance of zucchini. It works as a substitute for tomato soup with grilled cheese sandwiches.


Zucchini Soup


1) Chop 2 medium onions, 6 garlic cloves and 5 medium/large zucchini's into big chunks and fry them up with a little bacon grease.


2) Once browned, throw these ingredients into a blender along with 1 1/2 cups of fresh basil and pure with some chicken broth until smooth.


3)Return to pot and season with lots of cumin, salt/pepper and chipotle pepper to taste. You can also add more chicken broth if your soup is too thick. Allow the flavors blend over medium low heat for 15 minutes. Serve with a dollop of sour cream.


Last on this list was fried stuffed zucchini blossoms. This recipe really was an attempt to try to squeeze something different out of the garden. I was concerned because we didn't have enough zucchini blossoms so I used mostly pumpkin blossoms which are a bit more robust. I actually ended up preferring the pumpkin blossoms because they held up to being stuffed better and held more. I didn't notice any difference in taste.


Stuffed Zucchini Blossoms

1) Trim zucchini blossoms. This means cutting off the little "spines" that are at the base of the flower and cutting out the pistol from inside. Be careful not to rip the flowers doing this. You can still use them if you do, it's just a bit messy.


2)Mix ricotta cheese with your favorite fresh or dried herbs. I used fresh marjoram and thyme from the garden along with some garlic powder and salt and pepper. Put about a teaspoon in each blossom then twist the top of the blossom to seal it. Ricotta clumps well so I just used my hands to stuff them. A spoon was cumbersome.


3)Mix up a thin simple batter of water and flour. You want it thin enough that you can easily submerge the blossom in it. You can also add some spices to the batter if you like.


4) Dip blossoms and pan fry them in about an inch and a half of oil for a minute and a half on each side. Place on paper towels to drain, sprinkle with some salt and serve immediately.


Wednesday, September 9, 2009

Fresh Pesto All Winter Long


Perhaps I just don't have a discerning enough palette, but before I had homemade pesto I had no idea it was made mostly from basil! While the stuff from the store is tasty, it is no comparison to homemade. The main ingredient is easy to grow, the pesto itself is fast and simple to make and it stores all winter in your freezer so why not make it yourself?


This delicious basil recipe came from my favorite blog http://www.digginfood.com/. I tweaked it a little bit, adding a bit more garlic and cheese. That's the great thing about pesto, its easy to make it your own. I've also tried it with hazelnuts instead of pine nuts. Use what you have on hand and enjoy experimenting. With this simple of a recipe its hard to go wrong.

What you’ll need:

4 packed cups of fresh Italian basil leaves

4 cloves of garlic

½ cup pine nuts

½ cup Parmesan cheese (heaping)

½ cup extra virgin olive oil

Salt to taste

Instructions:


1. In a food processor, blend the basil, garlic, pine nuts and Parmesan cheese into a smooth paste. Scrape down the sides of the bowl. Then, with the blade running, slowly drizzle in the olive oil. Process until the olive oil is thoroughly incorporated and the pesto is smooth. Give the pesto a taste and add salt if necessary.

2. The pesto will keep for up to a week if refrigerated in a covered container. Bring it to room temperature and give it a good stir before using it in a recipe. To freeze, fill the individual cells of an ice cube tray with pesto and place in the freezer until solid. Then, wrap each cube of pesto in plastic and place back in the freezer (I just throw them all in a ziplock). To freeze larger portions, line a small cookie sheet or pizza pan with waxed paper. Drop ¼ cup mounds onto the wax paper and freeze until solid. Wrap each mound tightly in plastic and store in the freezer. Drop the frozen cubes of pesto into soups or sauces. When using frozen pesto in a pasta dish, allow the pesto to thaw and then stir in a few teaspoons of pasta water before tossing it with the cooked pasta—this helps distribute the pesto throughout the pasta evenly.


This recipe makes about ten ice cubes worth of pesto. Two ice cubes coat about two servings worth of pasta.


You can get at least 2 harvests off each basil plant. Just make sure you leave about 1/4 of the plant each time you harvest it.


Enjoy!

Sunday, September 6, 2009

Using Every Part


The other day I made the mistake of thinking I'd just run to the store and grab some chicken breasts for a dinner party I was doing that eveing. It was the first time I hadn't planned my chicken purchase for when it was on sale, and I was shocked by the regular price of chicken. I was pleasantly surprise however to find the split chicken breasts onsale. How hard could it be to turn them into breasts? I found out it was super easy, and by the time I was done I had seven breasts, a large handful of chicken bits and four cups of broth. My total cost, $4.50.


While there are directions online on how to debone a split breast, I honestly just took a go at it and chopped off the part that looked like the breasts I normally buy in the store. It's pretty easy to figure out, but incase you need directions, I copied these from Wikihow. I started by ripping off the skin so I could get a good look at the meat.

1) Place the chicken breast with the bone down on your cutting board.
2) Start cutting on the thickest part of the chicken breast.
3) Find where the bone starts. When the breast is split, this "vertical" bone is either on one side or the other, so one split chicken breast will have more bone in it than the other.
4) Cut down beside the "vertical" bone and follow it as it curves into the bone on the bottom. If
the piece you are cutting does not have this bone, just cut "horizontally" along the bone on the bottom.
5) Follow the bone all the way over to the other side of the piece of meat. Most chicken breasts only have one bone.
6) Trim off any unwanted fat or cartilage on the meat. Save all the non-meat leftover for making broth later, including the skin.

7) After you cut off the nice breast, go back over the leftovers and you can get a couple good pieces of meat from each split breast. From a package of split breasts I got enough meat to make a pasta dinner for three just off these bits.

8) Place all the non-meat bits in a stew pot and cover with water. Simmer with some salt for about an hour. Take it off heat and let cool (If you don't have time to do the stock right away, just throw it in bags and freeze it till you have time).

9) Strain broth and pour into a pitcher. Leave in the fridge overnight.

10) Skim off the fat and pour broth into quart bags and freeze.