Friday, March 19, 2010
Easy Roast Chicken
I went ahead and made this recipe for Jeff and I and ended up with enough for two meals. I reheated it in the oven adding a dash of oil, vinegar and soy sauce to keep it moist and it was even better the second day.
Have a great weekend and happy cooking!
Roast Chicken with Caramelized Shallots
Serves 4 to 6
Adapted from French Farmhouse Cookbook (Workman) by Susan Herrmann Loomis
I use a whole chicken cut into eight pieces; two legs, two thighs, and I cut each breast piece in half, crosswise, keeping the wings attached. You could also just use eight of your favorite chicken pieces.
3 tablespoons olive oil
3 tablespoons red wine vinegar
1 tablespoon soy sauce
4 large shallots, peeled and minced
sea salt and freshly ground black pepper
One whole chicken, cut into 8 pieces
generous handful of coarsely chopped flat-leaf parsley
1. Preheat the oven to 425ºF (220ºC).
2. In a large baking dish, one which will hold all the chicken pieces in a single layer, mix the olive oil, vinegar, soy sauce, shallots, and some salt and pepper.
3. Toss the chicken in the mixture, so they're completely coated with the shallots. Turn the chicken pieces so they are all skin side up.
4. Roast the chicken for about twenty minutes, until it starts to brown on top. Turn the pieces of chicken over. Scrape any juices and shallots over the chicken that may be clinging to the pan, and bake for another twenty minutes, or until the pieces of chicken are cooked through and the shallots are well-caramelized.
5. Remove from oven and toss in the chopped parsley, then serve.
Thursday, March 18, 2010
Irish Bloom Day


Tuesday, March 16, 2010
New Note Cards

Monday, March 8, 2010
Rediscovering Old Friends
let his turtle Ichiban (which he and his mother have cared for since Jeff was a teen) roam the yard and soak up the last rays of the season. Ichiban however, decided that she did not wish to spend her winter in her terrarium, and would rather bury herself somewhere in our yard and wait for spring there. Being a stubborn and trixy little turtle she eluded all our attempts to find her, but I often worried when I had need to dig in the yard or mow the grass that she might come to an untimely ending. Had I not been more observant, she might have meet this end on Saturday as I was hacking, yanking and digging the weeds out of our corner garden. Luckily she caught my eye as she gazed out at me from the overgrown patch of mint which, until very recently, existed in the garden. Jeffry's mother will be happy to know that Ichiban is now safely returned to her cage. 
This photo doesn't really do it justice, but just take my word that it was bad. Very bad. I had to reset several of the boards that hold the dirt in and the rock out, and i discovered several potato plants and green onions that had weathered the winter and were starting to grow again. I think the happiest part was getting rid of the giant mint patch that Jeffry had, until now, refused to let me get pull out. I will be planting a pot full of lovely not overgrown mint to make it up to him, and the chickens thought it was Christmas when I gave them all the weeds and creepy crawlies I had harvested.
As soon as we recover from the plague this patch will be planted with some onion sets, peas and (when the weather warms up a bit more) soy beans.

Wednesday, March 3, 2010
Recent Sproutings
I can only assume that Blanket was sleeping too soundly one day when a pea thief snuck into the house and plucked the seeds I'd planted before they even had the chance to sprout. The only other possibility is that many of my pea seeds were no longer viable. I think the former seems more likely. Aside from my rather dismal pea sproutage, many of our other planties are growing quite well. I took a few snapshots of their progress.

Raised Beds Part I
Another fear of mine was that having big rectangular boxes in our front yard would look harsh. I think having them only be 1 foot instead of 2 feet tall combats this somewhat. In addition, I have decided to scatter some wild flower seeds on the ground sort of willy nilly next to the raised beds. I am also thinking of getting either mint or thyme ground cover to plant next to them. I think adding a little wild unplanned feel to them will help soften their impact on the yard. The flowers will also help attract beneficial insects to the garden. I'm not sure how well all of this will work in actual application but hey, wild flower seeds are cheap and the experiences that experimentation brings are priceless.
After spreading a bit of time in the front yard with some wooden dowels and some bright orange surveying tape (that yes went right back into the emergency kit) I decided that we could fit three raised beds on the left side of our yard. They're measurements will be 8' x 4', 7' x 4' and 6' x 4' with the longest one being up by the house and the smallest by the street. I decided to make them progressively smaller to fit in with the meandering path we have doing down the middle of our yard.
It only took us two weeks or so to get around to it (first Jeffry had to sand one side of all the boards to get rid of some unexplained stains), but we finally have the first one built. It still needs to sit for a week or so before we seal the outside of it because we happened to get some of the freshest wood in the world and it needs to dry out a bit first. I did give us an excuse to clean out the garage though because we have to store this big sucker in there while we continue to make two more! I'll post more updates as our little construction project progresses. Thanks Jeffry for working so hard to indulging all my crazy projects!

*UPDATE: Since I wrote this post earlier today another raised bed has been constructed! Jeffry and I were apparently full of energy this evening and decided to bust out another raised bed after dinner. We had two drills this time so things went alot faster since we didn't have to keep changing from a drill bit to a screw driver head. The above picture is of the 7' x 4' bed we just finished building.
Tuesday, March 2, 2010
Strawberry Patch
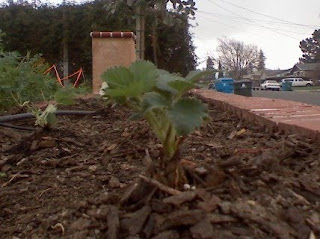
One project I am glad to finally have in the ground and establishing roots is my strawberry patch. A while back I read about a garden designer who likes to line walk ways with strawberries. I thought this would be a great idea for the meandering path that leads from the sidewalk to our front door. My gaze quickly turned however, to the two large built-in planters we have at the end of our front yard. Our yard is raised several feet higher than the sidewalk so it's flat instead of having a gentle slope from the sidewalk to the house. This is great for our plans to have a front yard garden, and resulted in two large planters being created by the retaining wall. This unused weed infested sun drenched location seemed to me to be the perfect place for an even bigger strawberry patch then we had originally envisioned along the walk way!

A few weeks ago we bought a very healthy flat (about 32 plants) of Quinault strawberries from our local nursery for a very reasonable $2.75 per six pack. I had toyed with the idea of buying bare root strawberries since they are even cheaper, but the only local place to find them was at Wal-Mart, and I don't have a lot of faith that their nursery department has properly cared for them. Bare root strawberries are also said to have a higher fail rate than regular strawberry packs, so I figured the initial money savings would probably even out in the end.
I chose to go with Quinualt out of the millions of available strawberry varieties for several reasons. One, they are said to be one of the most disease resistant strawberry varieties available. Two, they have very large fruit and flavor. And third, they are an everbearing variety. I had originally thought of planting two varieties, one june-bearing (determinate) and one everybearing (in-determinant), but ultimately decided given my uses for strawberries that I would be better suited by one that bears fruit all summer. If you like to make a lot of strawberry jam, then a june-bearing variety would be a better choice for you. (A little secret: I don't really eat jam, I just love to make it so I end up with tons of cans that I have to find creative uses for!)

Now all I have left to do is pick a mulch for the area and I will be on my way to a summer filled with sweet homegrown strawberries!! Oh and um, maybe I should weed the front "yard" while I'm at it...
Notes:
If you plan on growing a strawberry patch of your own, do not plant it where you grew tomatoes, potatoes, eggplant or okra the year before. These plants all can carry Verticillium Rot which can infect your strawberries.